Quantcast
Channel: TTS – EarnYourTurns
Viewing all 29 articles
Browse latest View live

Review: OMG’s TTS toe – beta, not better

$
0
0


TTS for 2014. Better cable posts and the first American 2-pin tech toe.

TTS for 2014 with better cable posts, optimized heel lever, and their own OMG 2-pin tech toe.

It has been a season now since Olympus Mountain Gear has introduced their own 2-pin tele toe to make a complete binding package. The looming question, is it ready for prime time, or is it still a beta binding? Sadly, the OMG’s toe piece confirms beta status, albiet with good performance if you’re willing to accept a few operating caveats.

By and large the response from mavericks willing to be on the bleeding edge of telemark binding progress has been positive for the Telemark Tech System. Nobody complains about Dynafit caliber touring efficiency. When dealing with the down side, there is lots of spring tension for ripping tele turns in all manner of snow conditions. You have to be willing to invest a little personal time and extra effort to make TTS work since, until this year, you had to piece your binding together based on whatever 2-pin toe you had or could obtain in combination with the OMG cable kit or a DIY cable. To top that off, jigs don’t exist and the number of people you can get first hand accounts from is limited.

TTS = Telemark Touring  System

For those who prefer step-in entry, ski brakes and a more reliable safety release, NTN is for you, not TTS. When uphill efficiency is a priority though, it is hard to beat the earn-your-turns functionality of TTS.

Unlike the NTN bindings, you can adjust the cable pivot location for tele-resistance on par with HH #3—#5, but not as conveniently as the Axl or Enzo. Once you dial in what power you like the only shifting you will need to do is between tele and tour mode. The only way you can beat TTS for skinning is by going full rando to shave weight, but then you sacrifice the ability to tele.

Putting it all together is simple enough. The OMG toe keeps the Dynafit 4-hole spacing of the Vertical series, without the fifth hole under the toe lever, so you can use a Dynafit jig for drilling the toe holes. The heel blocks are easy to mount, even without a jig. Although they are not immune to snow building up underfoot, the newer single piece cable block does reduce snow packing underfoot by providing one less cavity for the snow to be trapped by. It will be a great day when a unitary mounting block holds the toe and sheds snow everywhere behind the pins. Until then, a shot of silicone can’t hurt, and I’d also suggest teflon tape over the heel post. Though it is plastic, sticky snow does manage to bond to it which can be the start of a climbing post of snow when you may not want one.

About those turns…

OMG's toe pins open wide, with a high center, making entry more difficult than average for a 2-pin tech binding.

OMG’s toe pins open wide, with a high center, making entry more difficult than average for a 2-pin tech binding.

If you want knee-to-ski range of motion, you will need to build your own custom spring system. The current TTS configuration uses the Voile X2 cartridges and springs. They are longer and stiffer than the standard Voile cartridges, but do not have knee-to-ski range of motion without being fully compressed. If you keep a tight stance you’ll be satisfied, and this system with its aggressive under-the-foot pivot location helps maintain that.

A key part of the OMG cable system is the heel lever, which has been optimized to latch in securely when placed on top of the heel step, not the heel groove other heel levers are optimized for. With a tech-ready NTN boot, you lose the groove to the Dynafit heel insert.

OMG’s 2-pin tech toe

When closed, the OMG toe does not yield a confident click. Note the shallow angle of the pin arms below the cantilever point.

When closed, the OMG toe does not yield a confident click. Note the shallow angle of the pin arms below the cantilever point.

Where TTS comes up short is OMG’s own toe. While at the recent Backcountry Magazine gear test we needed to help most skiers into the available TTS bindings. Many of them were complete novices with getting into a tech toe — a known challenge for many folks — and simply could not get the jaws to clamp on their boots without a tech on his knees helping to manually lock the toes in tour mode (akin to DIN 12+ish). They agreed to ski ‘em locked out because, after all, you can’t tele and expect release anyway. No one regretted that decision and they skied great. Even those who did get in on their own recognized the lack of a confident snap from the jaws to let you know the toes were locked shut.

Further exacerbating that basic lack of a resounding click of the jaws when closed, is getting started when the jaws are open. The center point that swings up for open, or down to close, is much higher than any Dynafit or other brand of 2-pin tech binding out there. This forces an angled style of latching in that puts the boot further away on the high side and harder to align correctly as you rotate your toe down. Of all the 2-pin tech toes I’ve used – Dynafit’s TLT, Vertical, Radical and Beast, G3′s Onyx and Ion, the La Sportiva/ATK, Plum, or Fritschi’s Vipec, — the OMG TTS toe requires the most fiddle to get in, and the most faith to trust. It’s not impossible, but noticeably more challenging. Early on I was getting in about 1-in-5 tries — after half-dozen short tours, that’s down now to one in three. By comparison, I’m typically first try two-out-of-three times with a Dynafit TLT after 30 days. On the otherhand, when you’re opening the binding up to get out, OMG’s high center literally kicks your boot free, unlike the Vipec which, by comparison, has “sticky” pins.

Once you’re in, you’re in solid, but in my testing I locked ‘em out anyway — call it a lack of faith. If you compare the position of the arms between the various 2-pin toes when closed, the OMG toe shows the smallest deflection below horizontal, which implies less holding force. Dynafit isn’t a lot more, but it is noticeably more. In fact, were it not for all the new tech toes on the market the ease of entry function wouldn’t merit such scrutiny except that one, G3′s Ion, has clearly set a new standard for stepping in to a 2-pin tech toe — comparisons are inevitable.

The toe lever creates a nice, simple, solid lock and one that, in spite of the relative difficulty getting in to the pins, does hold solid. On the flip side, the toe lock lever has such a solid feel when locked, it takes a bit of force with the tip of your ski pole, strategically placed, to unlock it and open it back up.

Conclusion

While the OMG 2-pin tech toe is a bit more fiddly than other tech bindings, once you figure the tune out, getting in is marginally different than most other tech bindings and familiarity will breed the confidence that inspires faith. In the meantime, Mark Lengel, the man behind TTS, has adjustments in the works to make getting in easier, and snap tight when the pins close without having to lock it down. Others have done it, so it can be done, although, based on results, there appears to be a fair amount of art mixed with science in building a good 2-pin tech toe.

From a functional perspective the TTS complete binding rips great turns and offers the most efficient system for touring of any telemark binding. If you’re willing to be a beta tester, I can confirm, the reward is worth a few risks.

OMG
Telemark Tech System v2014
Complete binding: $400
Weight/pr: 2.0 lbs. (905 g)
Toe Conversion Kit: $350
Heel Conversion Kit: $200

© 2014
 
Related Posts
Verdict on TTS
Dynafit goes Bisensual
Review of TTS v2.0
BCTalk Thread: TTS strengths, weaknesses, workarounds


Tech Talk: What’s a millimeter between 2-pins?

$
0
0


Did you know? Early Dynafit toes had pins that could adjust.

Did you know? Early Dynafit toes had pins that could adjust.

Let me be up front here, this discussion may be too much minutia about something that only affects a small percentage of AT skiers. Nonetheless, it may provide insight for those who use Dynafit style tech bindings, or those looking to buy in.

A number of people have complained, myself included, on the need to adjust the pin gap on Fritschi’s Vipec. It is easy to think something is wrong with Vipec because it has to be adjusted. Keep in mind it operates on a different mechanism for release and it doesn’t tolerate the variance that, based on results, exists among tech inserts.

Considering the problems Garmont and Salomon went through with their tech inserts it’s not hard to believe there would be differences in their width. Vipec specs indicate the ability to adjust 1.2mm, implying that’s the range of possible insert widths, or pin-gap when the pins are closed. One-point-two millimeters isn’t that much, is it?

As it turns out, maybe it is. When dimensions are small, and tech toes are petite, tolerances need to be even tighter. Fritschi says the variation isn’t just between makers, it appears to happen even from within the same brand. Yeah, even the Dynafit brand.

Dimensional Details

There is plenty of evidence to prove inconsistent insert dimensions. Consider the plight of the rare but not unheard of guy or gal who does blow out of their Dynafits more often than they should. Most times this is due to dirt or ice in the inserts, but either way, it demonstrates how sensitive the system is to the pin gap.

Same data as Lou used, with slightly different annotation.

Same data as Lou used, with slightly different annotation.

Back in 2010 Lou Dawson published some data that G3 recorded to show the difference between their Onyx toe and Dynafit’s toe. It shows that Onyx has more force applied to the pins and needs to spread wider before it will tip open. This is due, not to a difference in spring values, but in the pivot location of the arms holding the pins. Actually, Onyx is designed to never cam open, but its new brother, Ion does.

In the case of Dynafit and the litter of knock offs, the pressure increases for the first few millimeters of spread, until they are about 59 mm apart. Wider than that and the force declines as the jaws open up, but doesn’t cross the threshold to open until they are 61 mm apart. When the pins are seated, history proves there is adequate force to hold you in — at least for feet on the ground style skiing. What should be obvious is the wider the gap when the pins are seated, the less distance they must travel before the force holding them in declines.

Tipping point for Dynafit's Vertical toe. Same dimensions for the Radical, but the Power Towers affect the results.

Tipping point for Dynafit’s Vertical toe. Same dimensions for the Radical, but the Power Towers affect the results.

According to Dynafit sources, the pin gap is supposed to be 2.31 inches, or 58.674 mm. According to sources at Fritschi, the variation in insert dimensions is up to 1.2 mm, or plus/minus 0.6mm. Is that relative to 58 mm, or some other dimension? According to Fritschi, the narrowest insert gap they have seen, is 57.5 mm, putting the upper end at 58.7mm.

Ion's tipping point - wider and with more force required.

Ion’s tipping point – wider and with more force required.

As you can see from the graph, if 59 mm is the area where the spring force on the pins peaks, that’s only 0.3 mm away from a wide sized insert, and in reality, allows a skoosh more than ¼ millimeter of spread per side before it wants to let go. Keep in mind, this is with a boot that is also restrained at the heel and the two work in concert to provide safety release. Furthermore, I did a double check on where the pins really flip open and it is easy to see that this occurs when the “biceps” of the arms holding the pins are horizontal. At that point the toe pins are at the tipping point of opening up. In reality, this is a full 3 mm further than where G3 measured the peak force on the pins. Sound confusing? For many, this is simply too much minutia and really does boil down to the fact that you either have faith the Dynafit system works, or you don’t.

Who Cares?

Being that the difference between staying in and pre-releasing is sometimes only a millimeter, perhaps the problem isn’t your binding, it’s the insert, even if the solution is to get a new binding. This whole predicament, premature release with 2-pin tech bindings, is why there are so many exciting new tech bindings being developed.

Going forward, angular rotation of the toe will be a common feature of Dynafit toe units.

Going forward, angular rotation of the toe will be a common feature of Dynafit toe units.

Dynafit already addressed this issue to a small degree with the Power-Towers in the Radical toe. Primarily added as an aid to clicking in, they help block excessive movement. Fritz Barthel’s better solution is to allow the boot to rotate at the heel with a toe that rotates a few degrees, unobstructed. It delays the onset of force on the toes, yielding lateral movement in the 13mm range. Simple, ingenious, and effective.

G3 addressed this issue years ago with the Onyx. The main difference was the geometry of the pin arms/jaws. A higher fulcrum point develops higher forces to overcome in spreading the jaws. This design feature continues with Ion and the development of a fast, easy step in method.

Vipec allows lateral release at the toe by holding the pins tight while letting the boot rotate on a carriage. When it swings wide enough, the jaws open up. It allows a pretty wide displacement before letting go, 11 mm.

Solution?

The good news is this is a concern for a minority of AT skiers. If you’re in that minority and are actually experiencing premature release the solution is simple. If you love your boots, get a new binding, one that allows more elasticity. If you don’t like your boots anyway, replace both. Likewise if you’re new to the game, and not ready to believe, get a new binding. Otherwise, if you have an older generation tech toe you need to make sure the inserts are clean, or shut up, man up and lock ‘em out. ;)

© 2014
 
Related Post
Dynafit VS Onyx Jaw Pressure on WildSnow
 

Is the NTN’s butt too big?

$
0
0

JFB testing the flex of NTN boots at Sugar Bowl, Jan. 2014

JFB testing the flex of NTN boots at Sugar Bowl, Jan. 2014

There is a fly in the ointment, brewing in the background with the New Telemark Norm system. It hasn’t gained much recognition because there aren’t that many people telemarking anymore, and of those who still are, not that many have switched to NTN.

Depending on what size boot you have, and the binding you pair it with, you may not be able to replicate the sweet tele flex you can get with the same size duckbilled boot. It also turns out, this is more noticeable with Garmont/Scott and Crispi brand boots than with Scarpa.

Flex comes from the sole

I first noticed this problem when testing Garmont’s Prophet with the NTN Freeride binding, almost five years ago. It wasn’t until I skied Crispi’s Shiver that I was convinced it was more than a minor aberration. With either boot, no matter how hard I tried to compress the bellows I couldn’t get adequate pressure on the balls of my feet. Instead, all the pressure was applied through my toes because the sole couldn’t flex as much behind the bellows. Both were size 26.5, with a large NTN sole.

With 75mm boots the sole is a consistent thickness in front of the heel and if a cable binding is used, tension is applied between the heel and toe. In the case of NTN, the boot is clamped between the toe and 2nd heel, aka the duckbutt. The presence of the duckbutt increases the thickness of the sole behind the bellows, potentially creating a discontinuity in the flex of the sole.

In any sized NTN boot the 2nd heel attachment yields superior lateral stiffness and better edging. However, there are only two NTN sole sizes, small and standard, for 8-9 different sized boots, 23-26.0 for the small sole, 26.5-30.5 for the standard. This means that the relative position of the bellows to the duckbutt is not consistent, and the resulting flex of boots is inconsistent.

The further the duckbutt is from the bellows, the more noticeable this issue is. It is unlikely I would ever have known this except that my foot size straddles the line where the sole size changes, which is also dead center in the bell shaped curve of foot sizes. Thus, with Scarpa I fit a size 26 with a small NTN sole, with Crispi and Garmont (now Scott), a 26.5 with a large NTN sole.

Measuring up

Notice how consistent Scarpa's dimensions are, regardless of NTN sole size. cte

Notice how consistent Scarpa’s dimensions are, regardless of NTN sole size. CTE

That there were dimensional differences between brands and sizes was not in dispute. It is possible that part of the issue is the overall sole stiffness of the Garmont and Crispi are more than Scarpa’s, and perhaps the asymmetric curve of Scarpa’s bellows makes flexing NTN boots easier. A simple review of the actual dimensions reinforces this.

I spent an afternoon searching for NTN boots in Truckee and made the following measurements in the graph to the right. You can see that the distance from the middle of the bellows on the outside of the foot is universally the shortest distance between the bellows and 2nd heel. With Crispi and Garmont (now branded Scott, same molds though) this distance was always larger than for Scarpa. In fact, after actually measuring it is clear that Scarpa has designed their boots to have a consistent dimension between the bellows and 2nd heel, regardless of size.

Confirming the sensation

Notice how flat Scarpa's TX is from the bellows forward when flexed in the Freedom binding.

Notice how flat Scarpa’s TX is from the bellows forward when flexed in the Freedom binding. CTE

Before I undertook that pesky accounting task though, I needed independent corroboration of the experience while skiing. A quick call to Jason Layh, instructor and coach of the Alpine Meadows kids tele team almost burst my bubble, because he thought his TX-Pros, size 27 with a large NTN sole, skied awesome. It is worth noting, he can ski anything so I couldn’t rely on that opinion alone. However, he had experienced the flex problem with Crispi and Garmont boots. He concluded it was a design flaw resulting from simply adding the duckbutt to a 75mm mold.

Next I enlisted the help of a relative stranger, JFB from the BCTalk forum. He’s a Tahoe regular, with the same size foot. We met at Sugar Bowl’s Judah parking lot and skied for about four hours with one foot wearing a Scarpa TX-Pro, size 26.0 with a small NTN sole, the other a Crispi Shiver size. 26.5 with a large.

To be sure, this is a subtle phenomenon, but noticeable nonetheless. JLB noticed the difference in stiffness immediately. It took a second run to notice the pressure was more on his toes, but he thought with practice he might adapt and fail to notice it. On the other hand, if he could flex the boots easier and drive pressure through the ball of the foot, as he could with the shorter NTN sole on the Scarpa boot, that would be preferred. As the day progressed, that opinion was only reinforced.

Contrast that with another friend, a former PSIA telemark examiner, using the Crisp Evo in a size 28.5 (BSL 328mm), who says the boots flexed great, with good pressure on his mets and the stiffest/best flexing tele boot he has skied in the last three years. However, if my theory was correct, his foot was large enough it shouldn’t matter.

Scope of the problem

Compared to Scarpa's TX, the Crispi Shiver has a higher angle from the bellows forward.

Compared to Scarpa’s TX, the Crispi Shiver has a higher angle from the bellows forward resulting in tele pressure shifting forward of the metatarsals. CTE

If the position of the 2nd heel relative to the bellows affects tele flex, then this could be a problem for more than skiers like me whose foot straddled the line between a large and small NTN sole size. It would progressively hinder a smooth flex the larger the distance was between the bellows and 2nd heel. Specifically, a size 26.5-27 would be the most affected with a large NTN sole, and size 23 would be worse than a 24 with a small NTN sole. I can confirm, size 26.0 with a small NTN sole rocks. Size 26.5 with a large, sucks. Er, except if the brand of boot is Scarpa.

It is also worth noting that the dead spot in the sole is more evident when using the TTS binding with the cable tension applied at the heel, than it is when using the NTN Freedom with cable tension at the second heel. I think part of that is due to the reverse ramp angle in the Freedom toe plate.

Whether or not this is a problem depends on whether you’re using a boot that might exhibit this phenomenon, and can you even tell. In other words, ignorance may be bliss but I lean on the side of empirical results that if a boot prevents you from flexing properly at the ball of the foot, telemark power and control will inevitably suffer. The sole is undeniably thicker and stiffer as the result of the 2nd heel. The further this is from the bellows, the more pronounced the sole stiffness. For big guys, wanting burly performance this is a great benefit. Except, generally, big guys have bigger feet and the problem doesn’t exist for size 27.5 and larger, only for 26.5 with the large NTN sole, and size 24.5 or smaller.

Resolving the issue

The solution seems obvious. Remove the dead spot behind the bellows. There are any number of solutions, but my guess is Crispi will wait until Scott changes their molds so the Voodoo NTN skis more like a Scarpa, and then they will too. For the sake of small feet one might dream of a third NTN sole size being created, but that will certainly not happen until interest in telemark skiing picks up, and with it a dramatic increase in equipment sales. If that matters to you, speak up and ask for it. I’m asking, but also wonder if the moon will be colonized before that happens.

© 2014
 

Telemark Binding Selection Guide (2014)

$
0
0


The Chouinard 3-pin Classic.

The Chouinard 3-pin Classic.

When you’re ready to march to the beat of a different drummer, whether you need a new challenge or your rebel spirit compels you that way, this guide is offered to help you decide what binding to get.

When it comes to picking a telemark binding there are many things to consider. Releasability, downhill power, touring freedom, and weight are the dominant characteristics to consider. There is no right or wrong answer with any. The best binding for you is not necessarily the best for someone else based on the boot used, style of skiing, and goals.

Releaseability

The common view of why telemarking is stupid.

Non-release reaction.

The majority of telemark bindings do not have a safety release function. To those who are coming from alpine skiing where the release value of bindings is adjustable, certified, and tested, this absence seems foolish. Yet, thousands of telemark skiers have learned and accepted that while this lack of release can result in injury, the inherent flexibility of the telemark boot/binding system tends to absorb forces that would cause injury in an alpine set up, and thus avoid those injuries; usually (see M. Tuggy, MD’s report). Please note, this ability to absorb forces is strongly dependent on your ability as a telemark skier to learn how to instinctively fall safely (generally a forward somersaulting action) to actively avoid injury. This may not be possible in all circumstances.

7tm is TUV certified for release.

7tm is TUV certified for release.

If you are new to the sport and reluctant to trust in this system there are a few bindings that offer a safety release. The 7tm is the only telemark binding with a TUV certified safety release system. Rottefella’s NTN bindings offer release capability, but it is not TUV certified. Voile made a releaseable binding for two decades, the CRB, but ceased production due to lack of interest. Like Rottefella’s NTN bindings it was never certified, but it did/does work. Voile’s CRB is available in the used market only.

Downhill Power

Axl - 4 lbs. of pure power with a free-pivot.

Axl – 4 lbs. of pure power with a free-pivot.

This is a factor that becomes very personal. Some people like a more active binding, some less. Activity describes how much the cable tension, or resistance to heel lift from the binding adds to the sensation of control when telemarking. Telemark bindings without cables, like a classic 3-pin binding, or Spike Lite, are considered neutral. Those with more spring tension in the cable are more active.

The  NTN Freeride has unequaled lateral control.

The NTN Freeride has unequaled lateral control.

How much power you like will depend in part on how stiff the flex of your boot is, and how wide your skis are. Generally the wider your skis, and the stiffer your boots, the more active you will want your binding. A cable with more tension will help with flexing a stiffer boot, and deliver more power to the edges of wider skis. In softer snow conditions, and with a softer boot, or narrower skis, less tension is needed, or may be sacrificed in exchange for more powder sensitivity.

There is another, subtle factor at play with telemark bindings; how quickly the activity is engaged. Cable bindings that are routed underfoot tend to add tension faster than cable bindings that are routed along the side of the binding. In addition, the position of the pivot affects how quickly tension is engaged as the heel is lifted on the trailing foot. The further aft it is, the faster it engages.
 

Downhill Ratings

Make/Model
Cable Routing
Pivot Pos’n
(behind pin line)
Ramp Angle
Activity
(HH rating)
Lateral
Control
Blk Diamond O1
Under
2 cm
0
2-4
4
Brnt Mt. Spike XT
Under
3-5cm
0
3-5
4
Brnt Mt. Spike NT
Under
3-5cm
0
3-5
4
Brnt Mt. Spike Lite
n/a
n/a
n/a
1.5
2
G3 Targa Ascent
Side
2
2-3
2.5
G3 Enzo
Under
2.5-5cm
2-4.5
3
7tm Pwr Tour
Under
2cm
0
2-3
3
Rottefella FreeRide
Under
n/a
0
3-5
5
Rottefella Freedom
Under
n/a
curved
2-4
3.5
22D Axl
Under
3, 4, 5cm
3-5
4.5
Voile Switchback
Side
2 cm
2-3
3
V Switchback X2
Side
3 cm
3.5
3.5
Voile 3-pin
n/a
n/a
0
1
2
OMG TTS
Under
50–82mm
n/a
4-5
4.5

 
The ratings in the table above are based on the Hammerhead scale, a cable binding developed by Rainey Designs with underfoot cable routing and adjustable cable pivot points. The numbers correspond to the cable pivot positions, from 1 to 5 with 5 being the furthest aft from the toe of the boot, and the most active. The most popular position, or power activity, is probably a tie between HH#3 and HH#4.

If you are learning to telemark a binding with an adjustable pivot location is recommended. You will be more comfortable adapting to a free heel with a lot of tension to begin with. However, it is recommended that as you gain balance and confidence that you dial down the tension to help learn the nuances of the telemark turn. Experienced leathernecks will assure you the telemark turn can only be fully mastered through the trials of learning to adapt with a soft boot and a neutral binding. That may not be completely true, but the perseverance it requires always yields improvements to technique.

Touring Freedom

TTS still delivers tons of free-pivot ROM.

TTS still delivers tons of free-pivot ROM.

There are many reasons to want to telemark, but since this site is focused on earning turns, bindings that don’t tour well are not presented. I tend to classify the touring function of telemark bindings as Awesome (those with a free-pivot feature), Bearable (low resistance to heel lift), and Sufferable (cable bindings with high resistance to heel lift). The downhill performance of cable bindings without a tour mode are identical to their siblings that have the tour mode, with a modest reduction in weight and a dramatic decrease in touring efficiency. When you are earning your turns in the skin track, resistance is futile.

A solid 50 deg ROM is plenty for long strides and tight kick turns.

A solid 50° ROM is plenty for long strides and tight kick turns.

The less friction or resistance there is to lifting your heel, and the lighter the weight, the better the touring capability. How far you can lift the heel, the range of motion, without resistance is a part of the resistance equation. More ROM yields less overall resistance and greater efficiency. In addition, the position of the pivot can affect efficiency. The further in front of your toe it is, the more inertial resistance there is. This is subtle, but is also affected by the weight of the binding and how far it extends behind the pivot. The more there is, the greater the inertial resistance affecting efficiency.

Since the new millenium, touring specific telemark bindings have a distinct tour mode. In most cases this is a switch that allows the toe plate to pivot freely, or with dramatically reduced resistance. How easy that switch is to engage is part of the touring value of a binding.

There are currently three touring configurations to chose from, in order of development:

Weight

Weight is the easiest feature to check, and generally speaking, the least important to consider. For in-bounds skiing it is irrelevant. For earning turns, all other features being equal, lighter is better.

Icing

The tendency for a binding to ice up is largely due to snow conditions. Moist, sticky snow is more likely to glam onto your bindings and pack into ice which increases the weight you are carrying, and can frustrate the ability to easily switch from touring back to turning mode. However, some bindings are more prone to icing than others.

In some cases you only need to toggle the mode switch back and forth a few times to dislodge the ice. In some cases you need to step out of the binding and chip the ice off; a deft jab with a ski pole can do the trick, sometimes you need a screwdriver. In descending order of likelihood that ice will hamper mode switching: G3′s Ascent, Rottefella’s Freedom, R’s Freeride, BD’s O1, 22D’s Axl, Switchback X2, 7tm Power Tour, Switchback, and G3′s Enzo. Snow can pack underfoot with TTS, preventing your foot from resting flat. It doesn’t prevent adding or removing the heel, but you’ll want to clean out the buildup before heading down.

Touring Ratings

Make/Model
Class
Weight
(oz)
Weight
(grams)
Pivot
(mm)
ROM
Icing
Peg Ease
Rating
Blk Diamond O1
A
30
850
-2
60+°
2
2.5
4.5
Brnt Mt. Spike XT
A
28
750
+8
45+°
?
3
3.75
Brnt Mt. Spike NT
A
28
750
+8
45+°
?
3
3.75
Bnt Mt. Spike Lite
B
13
370
n/a
½
3
3
G3 Ascent
A
25
710
+5
55+°
4
5
4
G3 Enzo
A
31
880
0
50+°
0
4
4.5
7tm Pwr Tour
A-
33
940
+14
65+°
½
1
3.75
Rotte Freeride
B+
32.6
925
+5
30°
1
3
2.5
Rotte Freedom
A-
27
775
-5
50+°
3
4
3.75
22D Axl
A
32
910
0
45+°
5
4.25
Voile Switchback
A
24
680
+4
50+°
½
3
5
V Switchback X2
A
26
740
+4
50+°
¾
3
4.75
Voile 3-pin
B
440
0
2.5
OMG TTS
A
17½
495
0
90°
2
4.75


In the touring ratings above the final rating is predominantly determined by how frictionless the pivot is. Ideally all telemark bindings with a free-pivot for touring get a rating of 5, but then other factors can erode that efficiency such as the touring ROM, weight, how easy the climbing posts are to engage, and a binding’s propensity for icing up. A higher value for icing means it is more likely to ice up, hampering mode switching. The values are relative.

Final Selection

With two different systems you need to decide which way to go: Classic 75mm with a duckbill, or NTN with a duckbutt. There are more choices in the 75mm category, and they are all solid choices, but what is possible in terms of power and freedom have pretty much limited out. That’s a pretty high limit compared to back in the day, but a limit nonetheless.

Scarpa's TX-Pro w/tech inserts

Scarpa’s TX-Pro w/tech inserts

The limit of what is possible with NTN is unknown. With NTN there are fewer boot and binding choices, and they span nearly the same range of power and freedom, but you need to be more careful in the boot you choose. If you want a frictionless pivot for touring, be sure to get a boot with tech fittings so you can either switch between a telemark binding using a 2-pin tech toe (TTS) or an AT binding. That’s another benefit of NTN, you can switch hit with the same boot and lock your heel if you desire.

With NTN there are more choices for a releasable binding. Generally speaking these systems provide more lateral control, and plenty of power. The boots are also lighter, compared to their 75mm equivalents.

While there are lots of choices to be made, hopefully the tables above and guidelines presented here will clarify, not confuse you when you’re ready to buy.

Remember, not everyone can tele.

Related Posts:
Risk of knee injury with telemark equipment, by M. Tuggy MD
G3 Enzo discontinued
2012 Telemark Binding Selection Chart

© 2014
 

First Look: Meidjo – merging Tech w/NTN

$
0
0

Meidjo updates -17jan15

“Ask and you shall receive,” goes the saying. We all know that isn’t always true, but it is often enough to keep the quip alive. In this case, it is true. For years tech savvy telemarkers have dreamed of a lightweight binding with Dynafit touring efficiency and a powerful NTN connection to the boot. With the delivery of Meidjo, the first design from French manufacturer the M-Equipment, the brainchild of Pierre Mouyade, that day has arrived.
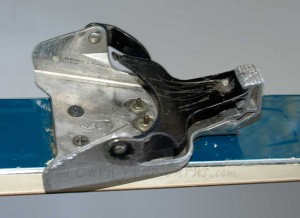
Meidjo: < 1 lb./binding, free-pivot, NTN compatible, step-in, releasable, and powerful.

Meidjo: < 1 lb./binding, free-pivot, NTN compatible, step-in, releasable, and powerful.
Requires 1) Faith in the 2-pin tech toe and 2) an early adopter license.


Last spring a video of a prototype telemark binding began circulating on the internet showing a binding with a low-tech toe and a spring-loaded plate that attached to the 2nd heel of a Scarpa TX-Pro. Skepticism ran as high as optimism for two reasons. First, that it would make it to market as early as claimed, by late 2014, and two, that it would ski very well. The first production bindings were delivered in December 2014, fulfilling the delivery claim. After a mere two short tours I can verify, it skis as well as promised, both uphill and downhill.


Meidjo, fresh from the factory.

Meidjo, fresh from the factory.

My first impression of Meidjo was of surprise at how professional it looked and felt. Over the years I’ve become accustomed to spartan simplicity, not just in the look and functionality of telemark bindings, but in their presentation. Meidjo came in a box with a classy looking illustration of the binding on the outside, and a well organized presentation of the pieces inside. This binding was clearly a well crafted piece of engineering with molded parts and plenty of attention paid to the details. While some pieces of the product are currently missing, such as ski brakes or crampons, their future inclusion has already been accounted for even in this first generation version.

The Low-Tech Toepiece

Meidjo's low-tech toe has alignment bumpers and stands 2mm higher than other tech pins with true lock out for touring.

Meidjo’s low-tech toe has alignment bumpers and stands 2mm higher than other tech pins with true lock out for touring.

The toepiece uses the classic 2-pin, low-tech design pioneered by Dynafit, but with a few modifications to make it easier to get in to, and more appropriate for telemarking. As many others are doing, Meidjo provides two tabs of bent wire to align the front of your boot against when stepping in. To further improve alignment and improve your odds of clicking in the first time, the pins are 67mm apart when open, just a few millimeters wider than your boot. The springs used on the toe jaws are twice as strong as Dynafit springs, so the jaws close with a resounding snap, and require more force to pry apart – something any thinking telemarker knows will benefit them when making turns.

To account for different thickness soles of NTN boots the height of the toe pins are 2mm higher than classic Dynafit pins, so the lugged soles of thicker boots won’t contact the base of the toe plate and interfere with release.

When touring, the jaws can be locked shut, not by pulling up on the metal bar in front, but by pushing down on a plastic piece that moves a metal tab under the release bar preventing it from moving down and opening the pin jaws. The beauty of this system is two-fold. First, you switch between walk or tele modes using your ski pole, without having to bend over. Secondly, it doesn’t just increase the resistance to opening, it prevents the jaws opening. In my maiden tour I was traversing icy slopes that mandated repeated stomping. I released only once, because I had forgotten to lock the jaws shut. Once locked, they stayed shut, even with repeated, aggressive stomping to hold an edge.

Step-In

To step in, first cock the baseplate into position by lifting it until the red bar seats in the bumper.

To step in, first cock the baseplate into position by lifting it until the red bar seats in the bumper.

Besides clicking in relatively easily to the toe pins, attaching the plate to the duckbutt is an easy, relatively intuitive procedure as well. To do that you must first cock the spring plate into position by lifting it up so the red bar, underneath the spring housing, between the springs, rests on the black plastic plate suspending at about 30 degrees. With the pins snapped on the toe, lower your heel until you feel, and hear, the housing catch around the duckbutt. Slowly lower your heel until you feel the plate slip more solidly over the second heel, then raise your heel a bit to pull the plate tighter until you hear the housing snap tight around the duckbutt. There is a little red tab in the middle that needs to be pushed back, causing the spring housing to snap solidly on to the boot. Lifting your heel a bit will trigger it to latch on. You are now fully connected to Meidjo and ready to rip some turns.

Downhill Power

As yet I haven’t done a true side-by-side comparison but experience suggests the Meidjo is equivalent to HH#3 or 3½. Not the most active binding available, but no slouch either and probably the activity level that most telemarkers prefer. It is certainly active enough to hold a solid edge on hard pack, and not so active that it will cause excessive tip dive in soft snow. The actual cable pivot position is about 60mm behind the toe pins, which is approximately the same as the forward position of a TTS binding.

While the pivot location of the “cable” is fixed, you can increase spring tension simply by tightening the lugs holding the springs on the cable bar. When I say Meidjo has a tension of approximately HH#3, that is for a lightly tensioned spring, or a setting of 2 out of 5 per Meidjo’s scale. If you want even more tele-resistance, a second set of springs is available that can be added in parallel (inside) the stock springs to increase the baseline activity of telemark tension.

Safety Release

In theory Meidjo offers a safety release, a combination of an adjustable spring tension on the side wings that hold the second heel, and the spring tension of the pins. In my limited number of runs I did not experience any release, nor should I have. At this moment it certainly isn’t certified, but like most telemark binding release systems, probably works. I can confirm it did release laterally with a kick from the side aimed at the back of the boot. In due time reports from the field will confirm or deny the “safety” aspect of Meidjo’s release system. The release tension is adjustable with a 3mm allen wrench to increase or decrease spring tension on the wings holding the sides of the duckbutt.

Exiting the binding

As with nearly any other tech binding, press the front toe lever down to open the jaws. Lift the toe of your boot a bit, then twist it to unhook the duckbutt from the binding plate.
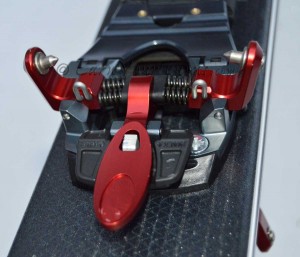
Features of the Meidjo telemark binding

Features of the Meidjo telemark binding

Touring Efficiency

As you might expect, with a 2-pin tech toe this is a very efficient binding for skinning since you only lift your boot when striding. However, to lock the plate out of the way so it doesn’t flop around or inadvertently latch onto your boot you must hook a wire over the central red bar to hold the plate down. This is a small wire hoop that requires finger dexterity to move. Not a big deal, except it means you must exit the binding to latch the plate flat, but you needed to do that to put your skins on anyway, right? To unhook the plate when you’re ready to rip the hide and make some turns Meidjo provides some tape to attach to the wire hoop so you can pull it back and release it. Except the tape is weak and mine tore the very first time. A better mousetrap is in the works for this function, but in the meantime I suggest substituting a strip of fiberglass reinforced strapping tape (Scotch brand 893-JPK) that is stronger and will last longer.

At just under 1 pound per foot (430 g or 15.2 oz/foot, size Lg), you’ll love how little this binding adds to your total drag weight.

The heel post is one of the weak ingredients of this binding. It is a simple plastic post that flips up easily with your ski pole to provide an angle of 7° or, flip up a secondary wire for a higher climbing angle of 13°. These are pretty common heights, but unfortunately, the posts are prone to collapsing under pressure. A cure is in the works, but not available at the moment. In the short term, consider making peace with a low-angle, meanderthal skin track. ;)

Mounting

To access the rear mounting holes the baseplate must be partially disassembled.  Hint: When reassembling, it is easier to thread the spring knobs on when the baseplate is flat.

To access the rear mounting holes the baseplate must be partially disassembled.
Hint: When reassembling, it is easier to thread the spring tensioning knobs on when the baseplate is flat.

It would be unrealistic at this stage to expect a jig for mounting this binding. Instead Meidjo comes with not one, but two, adhesive mounting templates that you can affix to your ski for drilling. Even with these convenient templates I would be remiss to not remind you the Carpenter’s Rule still rules, and only caution users to double-check that they set an accurate, precise center line down the middle of the ski before placing the templates for drilling.

Equally important is reviewing all the pieces of the binding because some assembly IS required and you need to understand where each part goes before you start drilling and screwing things together, hopefully in proper sequence and position, not screwing them up. The English directions are clearly a translation so you are advised to proceed with caution. If you’re not mechanically inclined, find someone who is to mount Meidjo for you.

Caveats

As this is a first look at a first generation binding many, if not all, the issues raised below will inevitably cease to be a concern in succeeding generations of this binding. For the moment, they are valid.

Although Meidjo does not yet offer ski brakes the holes to attach them to the binding already exist. They’re located between the cable pivot and the toepiece. These are scheduled to be available later this season.

Likewise for ski crampons. There is a set of brass inserts on top of the plate, just behind the cable pivot where a crampon clip will be attached. The clip will work with Dynafit compatible crampons.

For those on the Wet Coast, some icing is bound to occur. So far the only icing I noticed was snow packing in the cavity where the 2nd heel sits, which prevents switching from tour to tele mode without taking a moment to clear it out. It might mean you have to step out of the binding before you can step back in. Expect a round of heckling from your friends with Switchbacks.

The stainless steel toe pins of tech bindings are typically pressed into the arms or jaws of the toe piece. In the current version of Meidjo the pins fit tight, but are actually held with epoxy around their circumference plus a snap ring on the outside. Next years production run will be press fit like other tech bindings.

It is also worth noting the pins do not have ice cutting slots in them. Whether those will be added sooner or later remains to be seen. They aren’t on all tech bindings, but most.
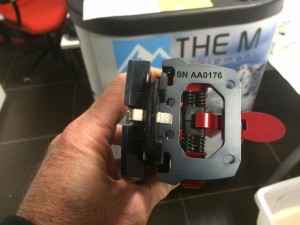
Fixed

Until next the production run, keep your eye on the pins that hold the toe jaws, the base plate, and the mode switch.

Until next the production run, keep your eye on the pins that hold the toe jaws, the base plate, and the mode switch.

The biggest concern is the tendency for five critical pins that hold the pin locking switch (1), the toe jaws (2), and the plate to the toe piece (2) to work themselves out. In a mere two tours the pins holding the toe jaws on one binding (but not the other) had worked themselves out by 2-3mm. It was a simple operation to tap them back in to place, but be aware you might need to. A modification is in the works to prevent this happening. For the moment though, best to watch ‘em like a hawk and be prepared with something to tap ‘em back in.

Fixed

The durability of the baseplate is categorically suspect because of its plastic composition. It looks well made but only time will tell if it can go the distance.

Conclusion

If you’ve been holding out on upgrading your duckbilled telemark rig to the duckbutted NTN because it didn’t offer any clear advantages, the arrival of Meidjo is about to change that. Admittedly it needs a tweak or two but even at birth it offers excellent skiing performance, superb touring efficiency thanks to a 2-pin tech toe and seriously light weight, plus step-in convenience and even (albeit unproven, uncertified) safety release. Now, if you also want a lower price you’ll have to be content with what you have a while longer. Actually, when you consider that heavier tech bindings are about the same price, but they don’t tele for squat, the price is competitive. If you’re ready to embrace the future, and can afford the bruises that come on the bleeding edge of innovation, the future of tele is here today.

M-Equipment
Meidjo
MSRP: ~ $550* (€449)
Weight/binding (sz Lg): 15.2 oz. (430 g)

* – based on $ to € exchange rate on 05Jan15.

Related Posts
BCTalk discussion on Meidjo

© 2015
 

Meidjo Revised to Fix Production Flaws

$
0
0

Location of the serial number on Meidjo.

The serial number is located on the bottom of the toepiece, and on the box Meidjo comes in. If your binding is higher than AA0140, you have the fix already.

The reports are flooding in and M-Equipment is responding by modifying components of the binding and tightening quality control. Thus, problems that are being reported are being fixed.

Pierre Mouyade, Meidjo’s designer contacted me to say, “Begin January I discover a problem on the low tech. The four pin inside the 4 spring of the low tech [toepiece] were [made of] Stainless steel. It was a mistake to choose that material. The pin are not stiff enough. Some rider deform these pins and some problems appear, mostly in touring mode.”

 
At least two people have noticed this. In the comments to the First Look review, Mathias said, “The BIG issue I have is uphill (the one thing I really thought would work!); at the slightest touch of hard snow or ice the toe-piece flexes and I lose the ski. This is even with the toe-piece locked (I’ve quadruple-checked this). It seems the construction flexes such that I’m able to escape the pins without the toe-piece releasing; it is locked also afterwards. Touring is paramount to this binding so I am very disappointed at the moment and can’t recommend it to anyone who plan on earning their turns…

Not to belabor the point, but BCTalk’s jfb noticed the same thing.
 
Pierre responds, “Since I discover that problem I immediately change the pins to hardened steel and there [is] no problem anymore.”

According to M-Equipment, there are 140 pair of bindings built with the stainless steel pins that are bending. If you think you have one of those, (S/N: AA0001-AA0140) contact the retailer or M-Equipment directly to confirm the need for an upgrade. The serial number is on the underside of the toe plate.

Revised mount will now have four screws holding the cable down.

Revised mount will now have four screws holding the cable down.

There is another problem that I wondered about, but have learned to keep quiet until proven otherwise. That was the position of the rear most screws, near the spring-loaded cable bars. They were in front of the cable and history shows that unless the rear-most mounting holes are behind the cable that tensions a telemark boot, they will pull out. Only one incident that has been reported so far, but there is a fix for that too, which adds two more mounting holes, with four centered about the cable bar.

One of the more noticable weaknesses of Meidjo was the touring hook. This sketch shows the new hook design.

One of the more noticable weaknesses of Meidjo was the touring hook. This sketch shows the new hook design.

As history has shown, using plastic saves weight, but manufacturing needs to be meticulous. Again, Pierre found that the plastic wasn’t properly cured, so it was brittle. (The lazy workers responsible for not reading the directions where tied up and whipped; they won’t be making that mistake anymore. Just kidding.) Since mid-January 2015 the quality control process has been tightened up on the plastic baseplate.

Early Adopter License required

It was mentioned in the First Look article, and anyone who has been around the block a bit knows that first year products are the bleeding edge of development, so the chances you’ll draw blood using a first year product are high. Literally. This puts a premium on getting the design close enough to perfect that a manufacturer doesn’t bury itself with costly replacement issues. It is why, even if they don’t announce it as such, customers who buy a first year product must expect they are part of a beta test team and there will be quality issues that either will or won’t be dealt with to a satisfactory level. If they are, then goodwill is established and problems resolved become a badge of honor, not a blemished reputation. If they don’t, a company will have to work doubly hard to overcome a B grade reputation. Replacing 140 pair of bindings isn’t chump change. Thankfully it’s only 140 pair, not 1000.

Retrofit Program

© 2015
 

Meidjo wins ISPO Gold Award

$
0
0


Meidjo wins Gold award for innovation from ISPO.

Meidjo wins Gold award for innovation from ISPO.

The M-Equipment’s first product, the Meidjo telemark binding will receive a Gold award from ISPO at the upcoming European trade show for its innovative design. Meidjo combines a Dynafit style low-tech toe piece with a spring loaded plate that attaches to the 2nd heel of a NTN boot. The binding weighs approximately one pound per foot, is step-in, and has a safety release. The design allows for the addition of a ski brake (yet to be delivered) and ski crampons. In addition, Pierre Mouyade, the Meidjo’s designer, plans to show an integrated tech-style heel unit at ISPO.

Upon receiving notice of the award, Pierre Mouyade posted the following notice on the M-Equipment website.
 

It is with some pride that THE M Equipment announces that MEIDJO, our free touring telemark binding has just been awarded GOLD Winner at ISPO Award. For the engineer that I am it is an invaluable consecration.
I would like to dedicate this award to my father who passed away two years ago now and it’s a little for him that I created this fine binding, at least that I have led this project to completion to offer you.

Then I want to thank my wife Evelyne and my children Thibault and Chloe who had to bear with their father in recent years who was 300% on the project. I also thank my close friends who have always believed in this project and who supported me.

Then, a big thank you to my industrial partners, especially Sylvain and Collet Amblard who helped me from the beginning of the project, without them I could not have brought this project to completion. I also thank the PACI who allowed me to build this business and give birth to MEIDJO.

Finally I thank this wonderful telemark family who greeted me at the Meidjo Telemark festival with open arms. It is having in mind that memorable moment and for La Meije (mystic mountain) that I particularly love, I called this binding MEIDJO. Thanks to Meidjo Telemark Association for agreeing that I give this name to the product that is yours today.

Thank you to Seb, Laurence, Aymeric, Franck, Raoul, Mika, Peter, Corentin, Lola, Aurora, Canard, Yves Boulélé Guido, Antoine and to all I omit in this moment full of emotion.

Pierre Mouyade, Meidjo's designer, with a prototype binding.

Pierre Mouyade, Meidjo’s designer, with a prototype binding.

Although the Meidjo has drawn plenty of attention for its clean looking design, it suffers from flaws that are common with many first year products, especially inaugural products. Thus, there is also an active ongoing recall for the first 138 pair of bindings produced prior to January 5th, 2015. More details on the recall here.

While the majority of development in skiing products revolves around alpine skiing it is refreshing to see an award go to a telemark product. Equally important is the message conveyed by Pierre Mouyade that his company will not be content with mere innovation, their goal is to spur a revolution of interest in telemark skiing.

© 2015
 

Serial Heelers – episode III

$
0
0


Serial Heelers, S1, E3

Serial Heelers, S1, E3

The reason for the lack of video endorsements in this place is simple, I’m not impressed with many. After awhile they all sort of look the same, and they show feats I’ll never repeat, and snow I only dream about anymore in the Sierra Nevada. I don’t need to be reminded where I’m not.

However, my morbidity over the current state of California’s snowpack should not prevent me passing on this porntastic tidbit. Being that it’s coming from The M-Equipment, makers of the tantalizing Meidjo binding that blends 2-pin touring efficiency with NTN functionality you’d think it’s a promo piece for the binding. Okay, I admit it is, but not by zooming in and showing the binding and how it works, but by showing how it is meant to be appreciated.

Even knowing it’s a promo piece it’s tough to deny this is one of the best five minutes of ski footage I’ve seen all year. The skiers are clearly accomplished mountaineers, they rip smooth tele turns, and the location, Verbier in the Swiss Alps, and cinematography, are stunningly beautiful.

Oh, and if you’re a telemarker thinking about upgrading to NTN, this vid was designed to get you to stop thinking and start buying. And for those who thought you fixed the problem when you fixed the heel, this vid might help to cure that delusional bubble.

© 2015


First Look: Moonlight’s Tele Tech Bindings

$
0
0


Moonlight Mountain Gear's Tele Rando binding let's you free the heel, or fix it.

Moonlight Mountain Gear’s Tele Rando binding let’s you free the heel, or fix it.

Interest in telemark bindings with a tech toe gained more advocates last week as fourteen writers and photographers from around the world tested beta versions of Moonlight Mountain Gear’s new telemark tech binding. Conceptually there is nothing new with Moonlight’s version of TTS as it mixes a low tech toe with a Voile Hardwire cable. As with many bindings in this new genre of tele bindings using the 2-pin tech toe it shows much promise, but the bindings tested were still in beta form.

Key Features

What distinguishes Moonlight’s tele tech binding from the original TTS by OMG are:

  1. A roofed spacer to minimize snow build up underfoot
  2. Cables that are easily removed to reduce touring weight
  3. Optional, longer spring cartridges to allow knee-to-ski motion
  4. Two options to improve lateral stability at the heel:
    i) by locking it with a minimalist AT low-tech heel, or…
    ii) using a heel stabilizer to improve free heel lateral stiffness

Roofed Spacer

Common features of Moonlight telemark tech bindings: low-tech toe, roofed spacer, cable connection post.

Common features of Moonlight telemark tech bindings:
tech toe + roofed spacer + cable connection post = 300g.

There was little question the snow shedding spacer would reduce snow build up. The question was, to what degree? Thankfully, it did so quite well. It didn’t prevent snow from collecting underfoot between the toe unit and cable post, but it never built up to the point where it pushed your boot up. The pitched roof appeared to allow snow to escape to the sides, even in sticky snow conditions. Surprisingly this was true even in cases where the roofed spacer only covered a portion of the gap between toe pins and cable hooks.

Low-Tech Toe Details

The current incarnation of the low-tech toe unit is a common knock off design made originally for skimo racing with a focus on lightweight. Thus, it takes a bit of careful alignment between the boot inserts and pins to latch in. Experienced Dynafiddlers won’t notice anything unusual; inexperienced newbies will have to figure out their own fiddle factor. In addition, it rarely gives a resounding snap as it closes. Thus users are strongly advised to swing the toe to make sure the pins are clamped tight. Bjarte Hollevik, Moonlight’s founder, acknowledges in humid conditions it can pack with snow, preventing the pins from fully seating. An improved toe unit is on the drawing board with clear paths to allow snow to escape and not be trapped under the toe arms (aka jaws).

Cable System

Pure Tele binding includes a heel stabilizer.

Pure Tele binding includes a heel stabilizer.

For the Pure Tele Moonlight binding testing was done with an obviously prototype configuration where the climbing wire pulled up from the front. The final version will pull from the heel, much the same as many existing heel posts so it will probably require a ski pole with a hard, bird’s beak sort of grip to be able to quickly, reliably pull the climbing wires up. With any luck, Moonlight will work a deal with 22 Designs for a spring loaded climbing wire.

The actual cable is a Voile Hardwire cable unit, with the option to get an extra long spring cartridge for people with big feet that need more travel distance on the springs. This is one of the obvious improvements Moonlight will offer. However, the heel lever latching the cable around the heel is the standard Voile heel lever, made for latching on to a 75mm boot with a heel groove, not on the top of the heel step. For it to yield a reassuring snap when you latch it on, it needs to be tight enough that putting it on takes a little extra effort compared to an OMG heel lever.

The position of the cable tested depended on the exact pair of skis tested. The proposed pivot location of the cable is expected to be approximately 5.5 cm behind the toe pins. Adjust-ability will be limited to where the cable post bracket is mounted.

My only semi-serious complaint was that the heel posts did not allow for simply latching the heel lever behind the climbing post to keep the cable tucked out of the way when climbing, or slinging the skis over your shoulder. It was assumed I would want to take the cables off to save weight for climbing. For a long climb, maybe I would. As a telemarker though I’m used to much worse and I’d rather have the cables ready to snap on my heels at the top of a climb and de-skin with skis attached than have to take my skis off to add the cables, remove the skins, and then, click back in to the binding. How embarrassingly similar to the inconvenient, time consuming procedure AT skiers put up with. ;)

Improved Lateral Control

Where Moonlight ups the ante in the telemark tech realm is with their two heel options. The most obvious, a feature often talked about, is the ability to use a lightweight tech heel, available with the Tele Rando binding. The heel unit is reminiscent of a Spartan tech race heel with a non-adjustable release value of approximately eight. This means the height of the climbing post when climbing is either flat or the equivalent of a low, 5° climbing post, something many free heelers will be underwhelmed by. However, if you want the ability to easily, and quickly, lock the heel, then this climbing limit may be acceptable. Keep in mind that with a flexible sole in a tele boot, you need less post height to maintain good skin grip. For a stiff soled AT boot, 5° isn’t much, but with a flexible tele boot, with good technique, it should be enough.

Moonlights patent pending heel stabilizer prevents lateral slop.

Moonlights patent pending heel stabilizer prevents lateral slop.

If you’re in the camp that a 5° climbing post is not enough, or you don’t need to fix your heel ‘cuz free heels are not a problem, Moonlight offers the Pure Tele binding. In this binding the heel unit comes with a higher climbing post (estimated ~10° incline) and a heel stabilizer which is a V-shaped piece of metal that, when properly positioned, hugs the sides of the heel insert of an NTN boot so that there is very little lateral slop at the heel when flat. It doesn’t prevent making a telemark turn while adding extra lateral control to both feet in a parallel turn, or the front foot in a tele turn. As is clear from the photo with the heel stabilizer, the associated climbing post is clearly an option still under development, but it added noticeable lateral control.

Conclusion

As mentioned earlier, this is based on a cobbling together of various existing parts for elements like the tech toes or heels, and the cables. The unique items that Moonlight brings to the table were tested in varying degrees of prototype development. The clear conclusion was that, even in prototype form the functionality was there. Any issues that were experienced were due to things like missing screws that weren’t properly tightened and came loose in the field, or were over tightened and couldn’t be easily adjusted. The validity of the performance comes from the fact that over a dozen of us were subjecting both the Tele Pure and Tele Rando bindings to a variety of conditions with different styles and expectations, but no serious complaints.

The only murmurs of disappointment I heard were about the dwindling availability of compatible telemark boot choices.

Moonlight Mountain Gear
Pure Tele
MSRP: $500
Weight/foot: 300 g (toe+heel+cable post) + 650g (cable)

Tele Rando
MSRP: $700
Weight/foot: 350g (toe+heel+cable post) + 650 g (cable)

© 2015
 

Mammoth shoot out: Outlaw VS Meidjo

$
0
0

Mammoth Mountain.

Mammoth Mountain.

The rule of Winter ’15 season has been to act fast when fresh snow arrives, otherwise there won’t be much left. A couple of late storms hit the Sierra last week. Though characteristically weak for this season their freshness coincided with fresh updates to 22 Design’s beta version Outlaw, and a host of revisions to Meidjo that will hopefully overcome weaknesses with the plastic claw assembly and the 2-pin tech toe. It was time to make turns to see if any new flaws were introduced as unintended consequences of fixing others.

A flurry of emails were sent and in short order a quick posse of tele testers was assembled, including B, E, and Mr. and Mrs. Toad, although she excused herself from the testing since her boots were too small to fit the Kingpins. At our disposal were two pair of recently updated Meidjos (S/N 302 and 303) and two pair of Outlaws. The small Meidjo’s were on on G3 Carbon Zenoxides (ver 2015), the large on a pair of 180cm K2 Shreditors (112mm). A pair of large Outlaw’s were on Moment Exit World (115mm), and a pair of smalls on 180cm Blizzard Kabookies (98mm).

Getting In

EYT test crews: B, J, K, and E.

EYT test crews: B, J, K, and E.

The main goal was to get feedback on the tele bindings from B and E. Both confirmed that stepping in to the Outlaw is ridiculously easy. I don’t think there’s an easier binding to get in to; arguably as easy as an alpine binding, but with less heel pressure required to latch in. Getting out, while improved, remains a task that requires coordination and a bit of technique. No plastic failures on either the new or old plastic and we skied Drop Out pretty heavily in conditions that had some heavy chunks strewn between soft, wind drifted snow; the kind of stuff where good balance is demanded, and a binding that helps with that task is appreciated. Outlaw and Meidjo delivered as needed.

The Meidjo did require more coordination to get in to the toe pins, but I noticed that neither man had much issue with it – one quick demonstration was all it took to get a sense of mastery. Meanwhile, I noticed Mrs. Toad was resetting her toes a third time while fiddling with her Dynafit Radicals.

Getting Down

As for downhill performance, both B and E gave the nod to Meidjo, but they both felt that was more a reflection on the ski than in differences with binding performance. As background, B has a pair of TTS bindings and Rottefella Freerides on Cham 107s. E has Freedom’s on both pair of skis he brought with him from Vegas.

B said the Outlaw felt more “hingy.” When pressed to explain what he meant he noticed that the Outlaw caused his Crispi boot to compress more on the back bellows than the front, and more so as his heel was raised higher. I think the fact that Outlaw forced the bellows to collapse more than Meidjo is a testament to it having a higher spring tension. However, the sensation of activity, or differences in the tension perceived is largely determined during the initiation of a tele turn. In the case of NTN bindings, pre-tension appears to have a greater influence, allowing full tension to be experienced immediately. Again, this depends to a large degree on the cable pivot location, the origin of the vector of tension we tele by.

In my experience the Outlaw is clearly more active, thanks to a higher spring rate, but the effective pivot location is 53mm behind the tech inserts, which is further forward than the Meidjo. Contrarily, the M has a softer spring rate, but a cable pivot 60mm back. The net effect is they both engage fast, so they impart balance and confidence in a zone known for the lack of it. This is one of the potential benefits of NTN that was not evident with the Freeride, but is with the Freedom. As for overall tension comparisons, B and E both agreed, Meidjo was very similar to Freedom in terms of downhill feel. Thus, Meidjo felt strong initially, Outlaw stronger inevitably, but the Meidjo was preferred for being slightly less active. There was also an undeniable contribution from the skis.

Without question the Shreditor slayed the Moment Exit World in terms of likeable performance. Overall the Exit World is 184cm long, but with an aggressively rockered tip and tail it acts like 164cm and what is worth liking about a short fat plug of a ski? Ideally the bindings would have been mounted on each person’s favorite ski. Instead, we used what reality offered. Thus, the Shreditor enhanced the Meidjo’s performance while the Moment tarnished the Outlaw’s. In other words, it wasn’t an apples to apples comparison.

Summary

Functionally it appears that, except for brakes and optional crampons the Meidjo and Outlaw are performing as promised. What remains unknown is the long term durability of the plastic portions of both bindings, and for that, we’ll all just have to wait another year and hope a few more guinea pigs are willing to break trail and find the fractures.

© 2015
 

The Case for NTN Grows

$
0
0


NTN's biggest advocate - Mitch Weber

NTN’s biggest advocate – Mitch Weber

As recently as 2013, the reasons to drop the duckbill for a duckbutt were significant, but mostly based on a personal requirement for releaseability. Not all pinheads agree that safety release is paramount, but neither are many of them claiming they might never want release. Few of the non-release advocates have actually lost ligaments in that gamble, while those who have demand it.

Then there is the ability to get into the NTN binding without bending over. A nice convenience, but it still won’t prevent your friends with training heels from making fun of you because your mind is broken just like your binding.

Along with release came brakes. Perhaps the single most convincing factor about Rottefella’s NTN Freedom and Freeride bindings was the elimination of bending over to put on a leash, and the likelihood of getting clobbered upside the head by your own ski in a cartwheel crash. That and edging power previously unknown in the telemark world.

As we head into next winter, the field of NTN binding choices will have grown from the Freeride to a total of seven models that work with a compatible, NTN boot. With that, the reasons to switch go from being merely significant, to compelling, depending on what your priorities are.

Rottefella’s NTN Options

The  NTN Freeride has unequaled lateral control.

The NTN Freeride has unequaled lateral control.

Besides the Freeride, there is the Freedom, both from Rottefella. Freeride got the ball rolling and still offers the sort of control aggressive skiers demand. Complaints of cracking frames have faded since the last round of revisions (2013), and patrollers swear by them for how easy they are to get in and out of. Even though they won’t set any records for touring efficiency, they’re good enough for short shots and infinitely superior to cable bindings like the Cobra.

Rottefella's NTN Freedom. Excellent skiing, acceptable touring.

Rottefella’s NTN Freedom. Excellent skiing, acceptable touring.

What ails the Freeride in the touring department, noticeable resistance and only 30° range of motion for touring, is cured with the Freedom. While there is still slight resistance in the touring mode, unless you’re breaking trail in fluff, it is barely perceptible and it delivers a full 55°+ ROM. Plus it has two heights of climbing post, not only one. It isn’t as active as the Freeride, but has a smoother, faster engagement. Many prefer the Freedom for that alone.

Burnt Mt. Designs NTN

Spike comes standard with single spring heel tubes, but you can double those up.

Spike comes standard with single spring heel tubes, but you can double those up.

Then there is Spike, the oft overlooked, easily adaptable binding from Burnt Mountain Designs. Spike provides plenty of downhill power, works with any NTN boot, and has five pivot positions to adjust the tele-resistançe. It has a frictionless tour mode but switching modes takes a bit of fiddling.

22 Designs NTN

22D's Outlaw. Final colors may differ from those shown.

22D’s Outlaw. Final colors may differ from those shown.

The one many are looking forward too, 22 Designs Outlaw, an Axl power train on an NTN chassis, will provide power on par with the Freeride but with faster engagement and frictionless touring efficiency for a full 45°+ ROM. One thing you are sure to love is how dang easy these bindings are to get in to. Easier than most alpine bindings, even low DIN alpine bindings. However, getting out of them requires learning a new way to fiddle with your pole, but you’ll master it eventually. It has brakes, but no claims of safety release, although a few beta testers did experience it once or twice.

Tech-style NTN

For the touring minded, Dynafit has invaded the telemark world and this is the reason the NTN system will steadily lure converts, not only from duckbilled telemarkers, but also from those who switched to AT for efficiency, yet miss the tele turn.

OMG’s Telemark Tech System

TTS for 2014. Better cable posts and the first American 2-pin tech toe.

TTS for 2014. Better cable posts and the first American 2-pin tech toe.

Olympus Mountain Gear’s TTS will have a revised toe and a heel system that can hardly be beat for simplicity and mountaineering functionality. This binding requires a bellowed boot with tech fittings, which means a NTN boot. The simple addition of snow shedding tape on top of the cable block does an admirable job of preventing snow building up under your toes. For those who like high tele-resistançe, TTS delivers that in spades. If you prefer less cable tension, you’ll need to experiment to fine tune the cable position, but there is some evidence that 45mm behind the pins will detune the pogo stick factor enough. As with most tech based bindings, the 2-pin touring efficiency and lack of weight make the TTS undeniably appealing.

Moonlight Mountain Gear

Moonlight Mountain Gear's prototype Tele Rando binding.

Moonlight Mountain Gear’s prototype Tele Rando binding.

TTS won’t be the only kid on the block sporting tech teeth at the toe. Moonlight Mountain Gear will offer what is clearly a TTS copy, but with some variation in the cable system and the option to improve parallel performance, either with a Dynafit-style race heel, or a simpler, heel stabilizer to add lateral control when the heel is flat. The cable system comes from Voile and is easy to remove for skinning, or put back on to tele. A roofed spacer between the cable block and the toe does a superb job preventing snow buildup underfoot. As of this writing (sept’15), the cable pivot position is not adjustable.

7tm et al

7tm with a Tech toe. Why not?

7tm with a Tech toe. Why not?

I’ve seen a prototype of a 7tm tech binding, but don’t know if it will be available this season. It has the same heel strap and spring system as the 7tm, paired with a tech toe.

There are bound to be a few other knock-offs of the basic TTS design, mostly small production run cable systems sold at an underground level. Nor will I neglect to mention the handful of tinkerers who can and will spend excessive time building their own heel contraptions for various tech toes to create their own, unique garage-band binding.

The M-Equipment

Meidjo v. 2, from M-Equipment. 2-pin tech meets NTN.

Meidjo v. 2, from M-Equipment. 2-pin tech meets NTN.

The binding that has many tele ducks quacking about switching from a boot with a bill to one with a butt is Meidjo (pr: may’-zho), from The M-Equipment. Meidjo combines a 2-pin tech toe with NTN technology. A spring-loaded plate hooks on the NTN second heel with a smooth, medium stiff flex that engages right off the deck. It isn’t over powering, but there is no lag time when engaging the power available. It’s also releasable, and will offer brakes in November 2015. There are even plans to offer a tech heel for those who want to switch-hit between a free or locked heel.

NTN Boots

Scarpa's TX-Pro w/tech inserts

Scarpa’s TX-Pro w/tech inserts

When you look at the choices available for bindings you’re struck by the variety available, a clear indication that there is plenty of interest in the new telemark norm. Unfortunately, things don’t look so optimistic on the boot side of the system.

There are now 10 models of NTN boots available for 2016 – Scarpa’s TX-Pro, men’s and womens, the TX-Comp; Crispi’s Evo, Evo World Cup and Shiver men’s and women’s, plus Scott’s NTN Voodoo and Minerva. Between them there is some variation in last shapes, but nothing particularly light weight, or with record setting cuff mobility. While AT boots may be lighter, and offer more cuff ROM, bellowed tele boots still walk more naturally, especially NTN boots sans duckbill.

TX-Pro for women. Same guts, different last and color.

TX-Pro for women.

The lack of choice and availability in the realm of NTN boots will be the biggest obstacle to growing the ranks of telemark skiers sliding on NTN gear. This is particularly poignant if you are interested in the possibilities presented with tech-style telemark bindings, for then your choices are limited to three models of boot, five if you count the women’s models separately. That also implies that for women, there is but one choice. Not exactly, but you get my drift.


Crispi Evo Rando - w/tech inserts.

Crispi Evo Rando
w/tech inserts.

When you consider the boot side of the equation, especially when you factor in what models can be tried on at your local shop, the choices boil down to Scarpa’s TX-Pro or TX-Comp. If you want tech inserts in the boot, you can chose between the men’s TX-Pro, or the women’s. Crispi has boots with tech inserts, but they are not readily available, or recommended.

While it is easy to harp on manufacturers to step up and provide more, their response is really driven by consumer demand. I’ve heard rumors Scarpa has improvements they are considering, but unless they’re confident they’ll sell enough to cover development costs plus profit, why bother?

Scott's Voodoo NTN

Scott’s Voodoo NTN

While it is easy to lament the lack of choice with NTN boots, the reality is the boot designs available are clearly adaptions of the most popular 75mm tele boots. Which means, though limited, they address what 90% of telemark skiers are looking for in a boot.

Conclusion

If you’re just switching over to tele, let boots be your guide. If the only boots that work with your foot come with a duckbill then stick with 75mm; the available performance is proven and solid, with safety release being the only missing ingredient. However, if you can find an NTN boot that fits your foot, the full range of performance available in the 75mm realm now exists with NTN, plus safety release, easier entry, and better touring efficiency. When you look at the variety of choices available with NTN bindings, and the features they provide, unless you’re in a monogamous relationship with chairlifts, the reasons to switch to NTN are compelling indeed.

I’ll admit I was reluctant to buy Mitch Weber’s claim that “NTN is the future of telemark.” His enthusiasm is finally being vindicated with results.

© 2015
 

Related Posts
Telemark Binding Selection Guide
Review: Rottefella’s Freeride
Review: Rottefella’s Freedom
Review: Burnt Mt. Design’s telepup, Spike!
Review: Telemark Tech System, v2
First Look: Meidjo – Tech + NTN
Meidjo gets a makeover, v2 details.
First Look: Moonlight’s 2-pin Tele Binding
Status of 22D’s Outlaw Beta Program

Preview: Moonlight’s Tele Pure binding

$
0
0

CAD drawings of the "final" Tele Pure binding design.

CAD drawings of the “final” Tele Pure binding design.

The inclusion of Dynafit-style 2-pin tech toes in a telemark binding, first pioneered as the Telemark Tech System is bringing a wave of enthusiasm and incremental development to the world of telemark bindings. A brief summary of the salient points of each binding made to work with NTN boots was detailed last week in the post The Case for NTN Grows.

Last week Moonlight Mountain Gear unveiled a revised website showing the first production versions of their tech style bindings with an optional heel stabilizer or a lighweight tech-style heel. As reported last season, the prototype bindings skied well but there were several unfinished details.

Based on images of the final product it appears that the essential elements of the Tele Pure and Tele Rando bindings have the same functionality as the prototypes. According to a MMG press release, every component of the binding has undergone “a total makeover.”

Tech Toe Changes

Lots of tweaks to the final toe. Higher, stronger, and resistant to icing.

Lots of tweaks to the final toe. Higher, stronger, and resistant to icing.

The tech toe is a completely new Moonlight design with a stronger, slightly taller chassis, stronger springs, and the toe pins utilize a new hardening treatment. As the drawing indicates, they may also be adjustable (not this year though), similar to how the Vipec works, and for the same reason – inconsistent dimensions on toe inserts. There is also a hole for securing a leash.

What is not visible from the CAD drawing is the inclusion of a soft rib of plastic underneath the toe arms to prevent ice formation. You may also recognize that the height of the toe arms seems high compared to Dynafit, more like G3′s Ion, to help with removing snow build-up, and to increase ski angulation.

Not shown are alignment tabs similar to those found on G3′s Ion, Marker’s Kingpin, or The M-Equipment’s Meidjo to make clicking in at the toe easy.

Cable Assembly

Longer springs from Voile allow more tele ROM, and a smoother flex.

Longer springs from Voile allow more tele ROM, and a smoother flex.

Behind the toe, the cable assembly is built by Voile, with longer spring cartridges to allow for deeper telemark turns, even for skiers with mondo size 30 boots. A subtle side benefit is a smoother tele flex. The cable pivot position is approximately 56mm behind the toe pins, which yields a cable tension reminiscent of HH#3+.

The roofed spacer between the cable pivot and the toe has been replaced with a plastic cover over the cable mounting post. It has a soft, slightly spongy feel that prevents snow from building up underfoot.

Heel Stablilizer

The two-pronged stabilizer from Norway.

The two-pronged stabilizer from Norway.

As expected, the one new item Moonlight brings to the table is a rerun of an old idea first used with cross country skis in the 70s, a heel stabilizer. Two prongs stand upright from the ski and fit into the slots of a tech heel insert to dramatically reduce lateral heel movement when the heel is on the ski. The original concept used the same forked shape, but used a post that was bolted to the back of a ski boot to be held laterally by the tuning fork prongs. This is just a cleaner implementation of the same concept, using the tech heel insert.

The heel stabilizer enhances telemark performance by allowing the front foot to transfer power through three points: the toe pins, the cable block, and the two-pronged stabilizer to eliminate vibration between the heel and ski. The net effect is more edging power on the front ski when telemarking, thus more confident turns in difficult snow.

Availability

According to Bjarte the first production bindings will be ready to ship in early November 2015. If you’re ready to embrace the future of tele today, Moonlight Mountain Gear’s Tele Pure can give you Dynafit caliber touring efficiency, alpine caliber turning precision, with the freedom of a free heel.

To some extent these claims are speculative. The prototype binding delivered solid turning and touring performance, with obvious shortcomings due to the prototype nature of the bindings tested. The drawings of the final design appear to address the issues that cropped up. Except for testing the final production version in the field to confirm actual downhill control, weight, or the resistance to icing up, the new Tele Pure from Moonlight Mountain Gear looks like a binding worth having, especially if the price advertised is in U$D, not €uro. For those who want a releasable tech heel, you’ll have to be patient a bit longer.

Moonlight Mountain Gear
Tele Pure
MSRP: $312
Weight*/foot: 1 lb. 2 oz. (510 g)

* – estimated

© 2015
 

Scarpa & Scott drop heel inserts on NTN boots

$
0
0

Not even a heel groove is left for Scarpa's 2017 TX-Pro.

Not even a heel groove is left for Scarpa’s 2017 TX-Pro.

Good tele skiers know there’s a time and a place for parallel turns and if it doesn’t add much extra weight, why not add that ability? Unfortunately it looks like lawyers are about to put the big kabosh on the final pieces of the “pink pony,” the Holy Grail of telemark systems with a binding that telemarks well, tours well, is lightweight, has a safety release, and when you want or need it, can even let you lock your heel. The ability to do all those things requires a system of compatible boots and bindings.

Two steps back

Prior to this year, 2016, no binding existed that could do all those things. Now that it is available, via the M-Equipment’s Meidjo and Moonlight’s Tele Rando binding, Scarpa has coincidentally eliminated the tech insert at the heel. For the 2016 season, the metal heel insert has been replaced with a removable plastic plug. This does allow the metal insert to be added by cannibalizing another pair of boots. Next year the sole will be solid, making an add-on difficult, but as the example of the CAST binding suggests, not impossible.

Scott was finally ready to add tech inserts to their NTN boots, the men’s Voodoo and women’s Minerva, but decided to follow Scarpa’s lead and only provide toe inserts. According to Scott’s US marketing manager for ski products, Topher Plimpton, the insert will be absent for liability reasons. This is truly a bummer for fans of Garmont’s Prophet since that boot offered a more alpine like cuff flex, something that would be beneficial with a locked the heel.

Safety requires Liability

Now you see 'em, soon you won't!

Now you see ‘em, soon you won’t!

This liability thing has been around for a long time but telemark equipment was free from the scourge of liablity, afterall, what isn’t clear about the trouble with skiing a non-releaseable binding? Telemarkers willingly take on that risk because they know they aren’t freeing the heel to be safer, they’re freeing it to be free’er, especially of things that bring lawyers out of the woodwork spoiling all our unsafe fun.

Now, if by chance the person who brought this liability trouble on us were a telemarker we might be able to shame some sense into him. But it was an alpine skier who was using Scarpa’s F1 Evo, the one with the Tronic mode switch, where the boot cuff would automatically be loose if the boot wasn’t locked into a Dynafit type binding at the heel. In a freak set of circumstances some guy managed to have his boots switch to walk mode while he was skiing downhill. He was hurt and threatened to sue Scarpa. According to an anonymous source, Scarpa’s lawyers made that one go away. After that close call, Scarpa eliminated the Tronic system, not for Europe where this happened, but for the US market where ambulance chasing lawyers salivate over such opportunities.

Setting the precedent

You can see an outline where the insert used to be.

You can see an outline where the insert used to be.

In typical legal fashion, the bribe to settle out of court doesn’t really make the problem go away, it sets a precedent that leaves Scarpa — or any other boot maker with a tech-compatible boot that has the potential to slip out of locked heel mode while skiing — potentially liable for further out-of-court settlements. That meant all those NTN tele boots with tech fittings already out in the world were lawsuit seeds waiting to sprout.

Any reasonable pinhead who had the option to ski an NTN boot in a Dynafit type binding should know the flexible bellows can cause the boot length to contract, “slipping out” of the heel pins into tour mode. No respectable telemarker would sue a boot company because their teleboot disengaged from the heel of a Dynafiddle binding. If you don’t know enough to support the sole under the bellows to keep it from flexing that doesn’t mean you deserve social justice because you were too stupid to know better. Even with tech inserts, flexible soled tele boots are inherently incompatible with alpine bindings, even though they seem to work.

The old adage, “just because you can, doesn’t mean you should” becomes law, not merely advice, in our increasingly litigious society. Thus, unfortunate as it may be it is not surprising that Scarpa decided to stop including tech heel inserts. In a way, it’s amazing it took this long considering the potential for that trouble existed since the beginning. But it’s still sad that lawyers have now entered the free heel sphere and in typical fashion their first move is to restrict our freedom to chose such a tool.

Crispi to the rescue!

All is not lost, however. While Scarpa and Scott have chosen to eliminate heel inserts, Crispi plans to continue offering them on their Evo and Shiver models. I hope it helps them sell more boots, enough that Scarpa and Scott reconsider their latest decision to remove them.

Related Posts
Scarpa’s F1 Evo review
Scarpa Recalls F1 Evo
Garmont Prophet review
Scott Voodoo NTN to add inserts
Scarpa TX Review
Scarpa TX-Pro Review
Meidjo’s Low Tech Heel
Other Meidjo Articles
Moonlight Mountain Gear’s Tele Tech bindings
News of Scarpa dropping Heel Inserts

© 2016
 

Overview of next gen tele bindings

$
0
0

DIY tele tech bindings are thriving.  TTS cable with a G3 Ion toe.

DIY tele tech bindings are thriving.

I was really hoping to end this season with a set (or two if they skied similarly) of bindings that I could go into next season with and be confident I had a good setup. I’m pretty close, but I need more time on these setups to have more confidence. And I don’t have two similar setups, so I will have to make some changes.

Here is a brief overview of the bindings I tried over the last two years: Rottefella Freedom, The M Equipment’s Meidjo, Burnt Mt. Design’s Spike, two pair of DIY TTS bindings, one with a Dynafit toe, the other a G3 Ion toe. Here’s my synopsis.

Rottefella Freedom

A negative ramp angle on the toe helps with faster turn initiation and bellows flex.

Rottefella’s NTN Freedom

  • Internet research told me these were the NTN bindings to buy.
  • I found them to feel heavy — they are heavier than others, but the weight in front of the boot makes it more obvious. (Ed. Note: as does the small but noticeable touring resistance).
  • They lack edge control; the low heel, high toe combo makes it physically difficult to angulate.
  • Sluggish — a combination of the above two issues.
  • I was able to sell 2 pairs though, so people still like them.

The M Equipment’s Meidjo

Meidjo. Skis great, tours better, but causes "boot jack."

Meidjo. Skis great, tours better, but causes “boot jack.”

  • Neutral stance with heel/toe-height just right.
  • The holy grail of features really draws me to this binding.
  • Precision and confidence — the combination of the tech toe and impressive lateral stiffness [deliver] excellent edge control [with a] smooth, progressive flex.
  • The deal breaker for me is the snow pack underfoot which gives boot jack. I have tried wider skis (87 to 105 underfoot), foaming, taping the gaps…without eliminating the issue. Not too bad if the snow isn’t deeper than 15cm and dry.
  • I have pre-released, but only when the duckbutt [clamp] became full of snow while skiing and it released upon landing off a jump. Never from the toes as with other tele tech [bindings].
  • I will hang on to these for now, but they are no longer mounted.

Burnt Mountain’s Spike Tour NTN

Burnt Mt. Designs Spike

Burnt Mt. Designs Spike


This is a funny one. There is nothing wrong with these bindings, yet I still don’t feel like they are what I want to use everyday. They are my backups right now.
  • These bite the toe of the boot and have excellent lateral stiffness. They hold an edge well and give confidence. Can be made very powerful!
  • They are super adjustable in every way you can imagine.
  • Initially my toe would slide back out of the spike’s ‘jaws’ but was sent a different baseplate that holds the toe in very firmly. Now, the boot CANNOT lift. Which some people may like. I can get used to it, but I prefer the boot (ahead of the bellows) to lift a little bit (less toe crunch).
  • Despite being step in, they can be hard to get on in soft snow or on the side of a hill.

DIY Tele Tech w/Dynafit Toe

DIY tele tech binding.  Dynafit Comfort tech toe, OMG cable assy., Voile heel lever, G3 heel post PLUS heel prongs.

DIY tele tech binding. Dynafit Comfort tech toe, OMG cable assy., Voile heel lever, G3 heel post PLUS heel prongs.


Components: Dynafit Comfort tech toe, Voile Switchback springs, OMG Cable Rod & Block, Voile heel lever.
  • I have spent more days on this setup than anything else this season. I really like them.
  • I run the Dynafit shim under the toe. No shim under the TTS block and use a 15mm heel. This gives the bellows a small gap that allows some flex in the boot.
  • Travel with the Switchback [springs] is okay. I do hit the end of spring’s [travel], but by the time I do it’s about where I’d stop anyway. This makes me wonder about long term durability though.
  • I just switched from TX Pro 27.0 to 27.5 and I am feeling the end of travel more with the bigger boot – it’s that close!
  • I have skied these hard in all conditions including boiler plate ice for several days after a refreeze and they never pre-released.

The drawback of this setup is the toe: stepping into it is a pain and having to lock it all the time is an extra step. I am also noticing the TTS wires are bent and the channels in the TTS block are already quite worn (not sure how many days on these, but I got them this season and I’ve skied a lot of other skis too)

Bottom line: I really like and trust this setup now. Nice lateral stiffness to the heel. I just don’t know if the lack of travel will cause a failure long term. And the step in could be improved. I’m looking forward to more days on this one.

DIY Tele Tech w/G3 Ion Toe

The favored rig. DIY tele-tech binding with G3 Ion toe, OMG cable assy. with long springs, Hammerheel, 2-prong.

The favored rig. DIY tele-tech binding with G3 Ion toe, OMG cable assy. with long springs, Hammerheel, 2-prong.


Mounted with a standard Ion toe and shim, 12mm shim under the OMG-TTS cable block with long screws, and a Hammerheel with an aluminum stabilizing prong (a Moonlight idea). I haven’t spent much time on the final version of this setup yet, but the days I have spent have been testing hard and pushing outside of the normal limits. I am expecting this setup to be the winner.
  • Super nice to step into. Stepping into the Dynafit or Spike feels tedious by comparison.
  • I added an aluminum prong behind the hammer heel made out of cut-and-filed channel aluminum. This fits into the low tech slots and holds the heel well and really improves edging performance on firm snow and paralleling.
  • The longer springs require a wire that bends out further around the boot (short TTS). This takes away lateral rigidity and therefore requires the prong to offset it.
  • I have never found the end of the abundant travel in these long springs.

Note that I am skiing the Voile lever on both my TTS setups. Even though the TTS lever ‘feels’ like it snaps in with more force, they don’t seem to hold the boot’s heel from moving laterally as well as the Voile lever.

Conclusions

Unfortunately, no two bindings feel the same. I’d like to be able to switch seamlessly between skis. I’d look at putting the long TTS springs on with the Dynafit, but I haven’t tested them enough to be sure – and I don’t like the old Dynafit toe for stepping in.

I do plan on getting a pair of Moonlights. My guess is they will be most like the ION setup, with a few differences (maybe improved lateral stability at the heel, hopefully a nice step in guide to improve on the Dynafit).

I’ll keep skiing all this stuff next year but suspect that I have some pretty solid kits in my ION TTS and the Dyanfit TTS with Spike as backup. Moonlight might take the place of the Dynafit kit with short springs.

Related Posts
Testing Time: Diary of DIY tele-tech bindings on BackcountryTalk

© 2016
 

The State of 2-pin Telemark Bindings

$
0
0

Telemark Tech bindings are here to stay.

The original Telemark Tech System binding (early beta version, circa 2010).

The original Telemark Tech System binding (early beta version, circa 2010).

The 2-pin connnection

When Mark Lengel first proposed the idea of the Telemark Tech System (TTS) skepticism was the typical response. That’s a near universal first impression of the confidence inspired by the lowly 2-pin tech toe, also known by its founding brand name, Dynafit, or other terms like low-tech, pin-tech, or merely as “tech” when spoken of over beers at the trailhead. Mr. Lengel knew better; those tiny pins can bite tight on the tip of a boot, which meant they might work for tele. As time always seems to prove with the puny 2-pin toe, it is unquestionably tough enough, especially I dare say, for tele.

NTN Boots required

In a nutshell the telemark tech system takes a generic telemark cable binding and replaces the 75mm toe plate with a tech-toe. Of course, this necessitates a boot with bellows and tech inserts at the toe. The choices at retail boil down a handfull of NTN boots: Crispi Evo, Shiver, or World Cup, Scarpa TX-Pro, or Scott’s Voodoo NTN. Scarpa’s early F1 and F3, the ones with the bellows, work too, but that’s only in the used market.

In theory you could get extreme in the do-it-yourself tangent and install inserts in a pair of tele boots, NTN or 75mm, but what value would a PhD in tele minutia get you? I mean, talk about the potential for trouble. Besides, Salomon already proved you can’t just “solder” those things on.

Dynafit touring efficiency

Dynafit caliber touring efficiency. The only thing you lift is your heel, not a binding.

Dynafit caliber touring efficiency.
Lift your heel, not the binding.

There are two advantages inherent with the tech toe. Not only is it lighter weight overall, it is unquestionably the most efficient too. When you skin with 2-pins, you only lift your boot. With all other free pivot bindings you’re also lifting part of the binding — some more than others.

Better Edging

Lest you think otherwise, the low-tech toe delivers superb edging thanks to the lateral stiffness of the pins. Again, you wouldn’t think those two pins could hold so tight, but results prove they do.

Adjustable Power

Though not a benefit of the 2-pin toe per se, depending on where you position the cable, a telemark tech binding can yield nearly any level of activity on the Hammerhead scale, potentially even higher.

Meidjo (pr: may-joe)  combines a tech toe with NTN connection.

Meidjo (pr: may-joe) combines a tech toe with NTN connection.

Change the connection from the real heel to the NTN second heel and the results are, arguably, even better. Those who have adopted Meidjo, the first 2-pin NTN binding, consistently report the engagement is faster, thanks to the lateral stiffness of the tech pins, and smoother because the tele tension is connected mid-sole reducing pressure at the ski tips.

Just Believe

If you’re among those who can’t believe it until you see it, remember there are hundreds of thousands of Dynafit converts now, so just give it a try and you’ll see, it really does work.

A screen grab from a FB post hinting at what 22D has up their sleeve for a tele tech binding.

A screen grab from a FB post hinting at what 22D has up their sleeve for a tele tech binding.

In case you wondered who else believes in tech for tele consider three from across the Atlantic: the M-Equipment in France, mythical Moonlight from Norway, and Italy’s Kreuzspitze, not to mention 22 Design’s recently announced Lynx. Add to that an untold number of garage-band do-it-yourselfers. Since imitation IS the sincerest form of flattery there are a lot of people who admire TTS for its lightweight, simplicity, and control.

Fit as a Fiddle

It isn’t mainstream yet because it requires a willingness to fiddle with the binding (it is an unavoidable part of the Dynafiddle legacy), either mounting ‘em (Meidjo requires 13 holes), and usually just getting in to the binding. However, when you get the hang of it you can get in with just a flick of a fiddle. YMMV depending on snow conditions.

An up to date OMG TTS binding.

An up to date OMG TTS binding.

The overriding appeal of the TTS system is simplicity and light weight. If you like earning your tele turns a TTS rig of some sort is in your future.

Keep It Simple

To keep it simple get the full TTS binding from Olympus Mountain Gear. Alternatively, if you already have a set of tech toes in your quiver, or prefer another brand, get the TTS cable kit and join the ranks of the TTS do-it-yourselfers. It is recommended as a first foray into the TTS world if you have the tools and mounting know-how.

Make it Simple

Here’s the other thing. The limit of this system is the springs which limit out. I’ll provide the details on that in a few more episodes. Because the system is so simple you may be tempted to build your own cable assembly. For those with the right tools and some design experience, especially with the advent of 3D printers, it is possible to come up with a pretty slick system that can provide equal or better performance than what is off the shelf.

In future articles on this subject, I will show you how to optimize the cable position, install inserts, plus some examples of home-brewed cable assemblies for OMG, Dynafit and G3 tech toes.

Special thanks to rjmh, jnichol, chamonix, kenji, dschane, and jasonq for sharing their results of tinkering with TTS.

© 2017
 
The original version of this article first appeared on TelemarkSkier.com. Minor edits have been made in this version, but the message remains the same. TTS rules and you can DIY.


Picking a 2-pin tech toe for telemarking

$
0
0

 OMG's telemark tech toe.

OMG’s telemark tech toe.

When selecting a tech-toe for a tele tech binding keep in mind that they were not designed for the stresses of telemarking, they were designed for use in a locked-heel alpine system. In an AT binding the pins only provide side-to-side clamping power, there is no forward pressure. With tele there is also forward pressure on the rear half of the pins from the tele cable tension. This forward pressure means the pins cannot open up without overcoming the friction it creates. The long term effects of this will probably mean the inserts will eventually wear through at their rear wall, hopefully not before you decide you need new boots.

Key Considerations

That said, the two things you want to consider when selecting a tech toe are:

  1. the lateral holding power (see table below),
    derived largely from the springs used under the toe arms or jaws.
  2. how easy the binding is to get in to.

The Ion 12 tech toe. Notice how much higher these pins are.

The Ion 12 tech toe. Notice how much higher these pins are.

Lou Dawson did us all a huge favor when he independently measured the spring force in late 2015 on the following popular AT tech toes. I’ve stepped into most of these bindings and can say that the perceptible difference in clamping power between a G3 and Dynafit is hard to tell once you’re in and the pins are fully seated. It can be sensed by hand if you try to pry a boot off the pins by rotating the heel without any tension at the heel. Add forward pressure with a spring-loaded cable and everything changes. There are no independently conducted tests of the various tele permutations possible. In addition not all inserts are created equal either, which also affects the connection and/or releaseability.

Ease of Entry

What IS perceptible is how easily you can step in to the toe. There are four things affecting this:

  1. Pin spacing when open
  2. The fulcrum point of the pin “arms”
  3. Spring rate (stiffness)
  4. Alignment guides

Pin spacing and alignment tabs help with positioning the boot for closing the pins on. Alignment tabs help position the boot fore and aft; when the front of the boot butts up against the tabs the boot is positioned longitudinally. The closer the pins are when open, the easier it is to adjust the angle of the boot so it is perpendicular to a line connecting the pins when you step down.

Dynafit's Radical toe, v1.0,  currently known as the Speed Radical toe.

Dynafit’s Radical toe, v1.0, currently known as the Speed Radical toe.

The other thing that helps, given that the boot is properly aligned, is how quickly the pins close down on the inserts. The further apart they are, or the harder you need to push down to close the pins, the more likely you are to twist the boot as the pins close and miss one or both inserts. The faster the closure rate, the less time you have to wiggle the boot. That’s why G3’s Ion and Zed or Fritschi’s Vipec Evo are neck and neck as the easiest tech toes to get in to, but only the Ion/Zed is a realistic candidate as a telemark tech toe.

Marker’s Kingpin (and unproven Alpinist) and Dynafit toes with the “power towers” (Radical 1.0, Rotation, etc.) are not far behind. The Salomon binding (manufactured by Plum) has a really strong spring with a slow closure rate, but their wide alignment bar helps keep the boot steady when stepping in. After that you have a plethora of classic Dynafiddle toes, ones that require you to learn how to put a pin in one insert and then skillfully rotate your boot down till it connects with the other side. It’s not an insurmountable skill to acquire, but you will occasionally still have moments of frustration when your step-in fiddle feels out of tune. Of these legacy style toes, the OMG toe requires the greatest “fiddling” proficiency.

There are bound to be many new developments in tech toes after the publication of this article. Use the criteria above when determining what toe to use for building your own DIY TTS binding, and ask around.

Relative Performance Comparison (circa 2017)

Manufacturer Model Relative Pin Force Relative Ease of Entry
Yak Plum #1 (strongest) 4th
Salomon MTN PIN #1 (est. tie) 3rd
G3 Ion 12 #2 1st (easiest)
Marker Kingpin 13 #3 2nd
The-M-Equip. Meidjo #4 (est.) 2nd
Dynafit Vertical #5 4th
Dynafit Radical v1.0 #6 2nd
OMG TTS #7 (est.) 5th

[Note: Fritschi’s Vipec toe is not included in the list above for at least two reasons. First, the pins can and will slide laterally without opening. They’re designed to do that to work with a heel that does not rotate, yielding lateral release at the toe like the majority of alpine bindings. Secondly, the release tension comes from a spring behind the pins inside the toe housing that extends back to where currently available cable systems would connect. Another contender for a PhD in telenurd absurdity.
Dynafit’s Radical 2.0 toe is not included because it allows for rotational movement of the heel. Cursory analysis suggests this will yield poor lateral control while telemarking.
The toes with “estimated” retention force were not measured by Lou Dawson, but are estimated by the author based on field tests. ]


“Safety” Release

Amer Sports tech toe, as either the Atomic Backland or Salomon MTN PIN.

Amer Sports tech toe, as either the Atomic Backland or Salomon MTN PIN.

Experienced telemarkers know that safety release does not guarantee satisfaction. Premature release is generally worse and the forces between boots and bindings while telemarking are pretty high when you’re in-control, significantly higher than alpine skiers when they’ve lost control. Thus strong springs are recommended, although experience has shown that almost any of these toes is sufficiently strong to hold when telemarking in control. It is when you’re on the fringes that things get less reliable. In that case, I suggest relying on luck, with a prayer of faith thrown in for good measure.

The Plum Yak toe.

The Plum Yak toe.

When in doubt, lock ‘em out, meaning, you can increase retention force exponentially by blocking the arms from opening with the toe lever. This is standard procedure when skinning, but is often used on the downhill too, like when you absolutely don’t want to risk coming out — either because you know you might based on experience, or because you still don’t believe the pins can/will hold — usually the latter.

TTS Configuration

There are other considerations to the toe besides holding power and ease of entry. There is also ease of configuration or assembly. For that, you need to consider the height of the pins above the ski and the cable system you’re matching with the toe, the subject of the next post in this series on DIY telemark tech bindings.


Note: This article first appeared on Telemarkskier.com in July 2017. It is reprinted with permission. Some editorial changes have been added for clarity.

Related Posts:
The State of 2-pin Telemark Bindings

© 2017
 

DIY 2-pin Tele: Use the Force (Luke)!

$
0
0

Before venturing any further in chronicling tele-tech bindings, it is important to understand the forces at play in a telemark turn. For the average telemarker, this article fits in the too much information category but for do-it-yourselfers, this should prove helpful in determining the critical sweet spot of the cable pivot position.

Activity

The key to control with the telemark turn is balance. Balancing between your two feet when dipping the knee is made easier with a spring tensioned cable attached to the boot. How much that helps, or doesn’t, is commonly referred to as binding ‘activity.’ Charlie Ziskin, a Colorado Front Range tele guru with decades of experience defines activity as “the ability of the binding to ‘actively’ help break the bellows of the boot, so you’re feeling pressure through the ball of the foot, not the tip of your toes.”

The effect of cable tension is a binding that actively helps to flex a plastic tele boot.

The effect of cable tension is a binding that actively helps to flex a plastic tele boot.


Cable bindings help break the bellows of the boot by providing a force to balance against. One of the results is increased tip pressure on skis; usually an advantage on hard snow and, without an adjustment to your tele stance, a potential liability in deep pow.

Regardless of whether more or less activity is desired, more active bindings have cable pivots that are further back than neutral bindings, with stiffer springs adding more force to the equation.

Vector Modeling

To understand what is going on, it helps to create a simple model of the components. When you sketch it out, the cable can be represented as a vector with a direction and force that resists the act of lifting the heel of your boot. The more you lift the boot and compress the spring, the more force is created, which augments flexing the rear boot in a tele turn. Looking at it this way, it is easy to see how the cable position and spring rate affect the perceived ‘activity’ of the binding.

Comparing cable positions and angles for Voile's Switchback (red) and 22 Designs' Axl (blue).

Comparing cable positions and angles for Voile’s Switchback (red) and 22 Designs’ Axl (blue).

Consider 22 Designs Axl and Voile Switchback as examples. The reputation for these two bindings are at opposite ends of the activity spectrum, with the Switchback being a ‘neutral’ cable binding and Axl, the free-pivot descendant of the Hammerhead, the epitome of adjustability and the benchmark of comparison for tele power. In the case of DIY 2-pin tele bindings, the potential for even more adjustability and/or activity exists but there are practical limits.

If you take a snapshot of the cable position from the side, the angle of the cable defines the direction of a vector with a resistance to change determined by the stiffness of the spring; the stiffer the spring, the stronger, bigger, longer the vector.

Resistance to heel lift can be determined with a lil’ trigonometry by splitting the vector representing the spring force of the cable into vertical and horizontal components. Analyzed this way it is easy to see why the Switchback is more neutral than an Axl in position 3 (or 2 or 1). For an equal spring rate, the percentage of resistance felt with Axl #3 (HH #5) is higher than for a Switchback.

 The steeper the angle, the larger the vertical component of force—resistance to heel lift—otherwise known as activity.  (Angles shown are simple examples, not measured values)

The steeper the angle, the larger the vertical component of force—resistance to heel lift—
otherwise known as activity. (Angles shown are simple examples, not measured values)

Angular rate of change

The tension starts out small but grows as the boot is lifted. The increase in force is because the spring is being compressed, but the rate at which it increases is due to the angle of the cable based on the pivot location and boot connection point. As the boot is rotating through a fairly large radius, defined by the length of the boot, the cable is rotating through a smaller circle which causes the rate of angular change to be much faster than the boot angle. Therefore, not only is the vertical component of the spring tension higher for any given boot angle, but it grows more rapidly the further behind pin line the cable pivot point is. This translates into faster engagement and higher activity.

Comparing the rate of angular increase. For approximately 20° of heel lift, the Switchback cable changes 21°, Axl 25°.

Comparing the rate of angular increase.
For approximately 20° of heel lift, the Switchback cable changes 21°, Axl 25°.

Up/Down, Fore/Aft

In the world of DIY TTS systems it then becomes easy to conceptualize where to put the cable pivot, and how that location is affected by its horizontal and vertical position relative to the toe pins. The further back and below the pins, the stronger the vertical component will be. According to Pierre Mouyade, Meidjo’s inventor, “2mm of horizontal change is like 1mm of vertical.” That may not be a totally accurate formula, but it’s a good rule of thumb.

The reality is, for any given toe there is more latitude to adjust horizontal than vertical position. Tech toes that are higher, like G3′s Ion, inherently offer more vertical adjustment which mandates some sort of shimming at the cable block. Alternatively, if you want to increase vertical adjustability with a low tech toe (classic Dynafit), you will need to shim not only the cable block but the toe unit as well.

In other episodes of these 2-pin Tele Chronicles we recommend mounting positions for the cable, some examples, and other considerations.

Related Posts
DIY 2-pin Tele Chronicles: State of the Art
DIY 2-pin Tele Chronicles: Picking your toes

© 2017


2-pin Tele Springs: Size Matters

$
0
0

Size matters. J Nicol checks to see if these springs measure up.

Size matters. J Nicol checks to see if they measure up.

While the effect of cable pivot location tends to dominate the sensation of a tele tech binding, the next strongest binding component of the tele sensation comes from the springs used. To some extent you can trade one for the other; meaning a stiff spring and a forward pivot are somewhat equal to a soft spring with a pivot farther back. It’s not an exact replacement, but more importantly, the further back you put the pivot the longer spring you need so it doesn’t compress too far too fast. Therein lies the limit with a real heel 2-pin tele binding — springs that limit how deep you can tele. So let’s take a closer look at the cable rods, heel throws, and springs.

Cable Rod limits

Homebrewed cable rod connection for DIY TTS.

Homebrewed cable rod connection for DIY TTS.

If you go with Voile springs and cable rods, or Kreuzspitze springs and rods, you will be able to fit any size boot but need a post to hook them on to, like Kreuzspitze or B&D. Voile’s sizing system of — long and short cable rods, plus long and short spring cartridges and long and short yokes for the heel lever, and heel levers — will fit pretty much any boot with a forward pivot (< 60mm). I did not run through the numbers for Voile like I did with OMG. If you have a small foot, and want an aggressive pivot, plan to shorten or add threads to the short cable rods and make sure the yoke is the short version. If you want lots of spring travel too (with small feet), go with Kreuzspitze. This is pretty much the same system as Voile or OMG except the springs are universally longer so you can flex further before limiting out. The difference in travel distance is only millimeters, but that translates to extra degrees of forward rotation.

The OMG system has fewer miles on it so I took the time to map out what combinations of short and long cable rods work with Voile’s standard and long springs for each boot size. As the tables below show, for a 60 mm pivot you can fit small to large boots (mondo 22 – 28, BSL: 275-310) with a small cable rod. For size 28.5 and larger, you need the large cable.

In the tables below green cells mean the specific combination of cable rod and spring for each column will fit that size boot for the pivot location of each table; red is outside the cable size range, while orange is on the edge but might work.

Cable/boot compatibility for 49mm pivot, 20mm heel post:

49mm Pivot Short Rod/Std Spg Short Rod/Long Spg Long Rod/Std Spg Long Rod/Long Spg
Cable Length 220-245mm 240-265mm 245-290mm 265-310mm
298.8 mm 30-30.5 30-30.5 30-30.5 30-30.5
286.3 mm 29.5-30 29.5-30 29.5-30 29.5-30
278.6 mm 28.5-29 28.5-29 28.5-29 28.5-29
269.9 mm 27.5-28 27.5-28 27.5-28 27.5-28
261.3 mm 26.5-27 26.5-27 26.5-27 26.5-27
253.7 mm 25.5-26 25.5-26 25.5-26 25.5-26
245.7 mm 24.5-25 24.5-25 24.5-25 24.5-25
238.1 mm 23.5-24 23.5-24 23.5-24 23.5-24
230.5 mm 22.5-23 22.5-23 22.5-23 22.5-23

Cable/boot compatibility for 61mm pivot, 20mm heel post:

61mm Pivot Short Rod/Std Spg Short Rod/Long Spg Long Rod/Std Spg Long Rod/Long Spg
Cable Length 220-245mm 240-265mm 245-290mm 265-310mm
287.2 mm 30-30.5 30-30.5 30-30.5 30-30.5
274.7 mm 29.5-30 29.5-30 29.5-30 29.5-30
267.0 mm 28.5-29 28.5-29 28.5-29 28.5-29
258.4 mm 27.5-28 27.5-28 27.5-28 27.5-28
249.8 mm 26.5-27 26.5-27 26.5-27 26.5-27
242.2 mm 25.5-26 25.5-26 25.5-26 25.5-26
234.3 mm 24.5-25 24.5-25 24.5-25 24.5-25
226.8 mm 23.5-24 23.5-24 23.5-24 23.5-24
219.2 mm 22.5-23 22.5-23 22.5-23 22.5-23

Cable/boot compatibility for 73mm pivot, 20mm heel post:

73mm Pivot Short Rod/Std Spg Short Rod/Long Spg Long Rod/Std Spg Long Rod/Long Spg
Cable Length 220-245mm 240-265mm 245-290mm 265-310mm
275.7 mm 30-30.5 30-30.5 30-30.5 30-30.5
263.2 mm 29.5-30 29.5-30 29.5-30 29.5-30
255.6 mm 28.5-29 28.5-29 28.5-29 28.5-29
247.0 mm 27.5-28 27.5-28 27.5-28 27.5-28
238.6 mm 26.5-27 26.5-27 26.5-27 26.5-27
230.9 mm 25.5-26 25.5-26 25.5-26 25.5-26
223.0 mm 24.5-25 24.5-25 24.5-25 24.5-25
215.5mm 23.5-24 23.5-24 23.5-24 23.5-24
208 mm 22.5-23 22.5-23 22.5-23 22.5-23

Cable/boot compatibility for 85mm pivot, 20mm heel post:

85mm Pivot Short Rod/Std Spg Short Rod/Long Spg Long Rod/Std Spg Long Rod/Long Spg
Cable Length 220-245mm 240-265mm 245-290mm 265-310mm
264.2 mm 30-30.5 30-30.5 30-30.5 30-30.5
251.7 mm 29.5-30 29.5-30 29.5-30 29.5-30
244.1 mm 28.5-29 28.5-29 28.5-29 28.5-29
235.6 mm 27.5-28 27.5-28 27.5-28 27.5-28
227.1 mm 26.5-27 26.5-27 26.5-27 26.5-27
219.6 mm 25.5-26 25.5-26 25.5-26 25.5-26
211.7 mm 24.5-25 24.5-25 24.5-25 24.5-25
204.3 mm 23.5-24 23.5-24 23.5-24 23.5-24
196.8 mm 22.5-23 22.5-23 22.5-23 22.5-23

The tables above only determine whether the cable/spring combo will fit the boot for a “standard” height tech toe, meaning pins 27 mm above the ski deck with a heel post 20 mm high. Notice that small boots only work for pivot positions forward of 65mm with short cable rods. If you use a higher toe (G3′s Ion) and subsequent heel post, even fewer small boots will work unless you shim the cable post from below.

Even though the OMG short cable rods have 45mm of thread on the ends (1¾”), the spring cartridges will hit the bend in the rod at around 25mm (1″) of thread depth. That’s why the short rod cable assemblies only show 25mm of adjustment range in the tables above. Nonetheless, for average sized feet, the short rod with either spring should fit fine for most pivot locations.

Springs: Size matters

In practice the factor making a TTS binding fun to ski is how far you can lift your heel before the springs limit out. In general it is easy to show that you get more range of motion with a forward pivot and/or a spring with more travel distance, which is typically a third to a quarter of the total length.

It doesn’t take long to realize springs for a 2-pin tele system need a larger compression range, particularly for stiffer springs, than are available from Voile’s springs built for 75mm bindings. This is more true for guys with boots larger than 28.5 that want a stiff spring. You can figure this out yourself by solving for the intersection of two circles using quadratic equations, or sketching it out with an accurately scaled graph and a compass.

Determining the limit of heel lift by drawing the intersection of two circles; the radius of the heel throw about the toe pins, and the radius of the stretched cable where the spring is limiting out.

Determining the limit of heel lift by drawing the intersection of two circles; the radius of the heel throw about the toe pins, and the radius of the stretched cable where the spring is limiting out.

If you take the time to calculate it you will find that for stock 75mm springs, with a travel distance of approximately 35mm, you will feel the spring begin to limit out in the range of 30° to 39° depending primarily on the pivot location. Further forward yields a 39° limit, and an aggressive pivot further back only 30°. You can add a degree of mobility for smaller feet, or subtract with larger.

Increase the spring travel distance 10mm (~⅜”) and the range improves almost 10°, from 30°–39° for an inch of compression (1″=24.5mm), to 37°–50° for 1½” (~35mm). Again, a higher range of motion before limiting out the further forward the cable pivot is and the smaller the boot, or less as the pivot moves back and boots get longer.

Estimated boot range of motion with standard and long springs.

Spring TD Std: 25mm (solid @ 35mm) Long: 35 mm (solid @ 45mm)
Pivot sz 24 (BSL:275) Sz 30 (BSL:333) sz 24 (BSL:275) Sz 30 (BSL:333)
47 mm 39.4° 38° 49.7° 48.5°
85 mm 30.9° 30° 37.7° 37°

The angles computed above are not the limit to your leg range of motion. First, there’s another 10mm of spring compression available, which should allow another 10° of rotation. Plus you can add in the flexibility of the bellows and cuff to increase leg mobility another 35°–40°. Depending on how deep you go, that may be enough. I used compression values less than the max because the spring compression forces change exponentially as you approach max compression, and non-linear when they go solid. You might experience more range of motion than my numbers indicate, but only for brief moments, like in a crash or a deep knee tele bounce.

Response from those who have tried the longer springs is they provide enough range of motion, but they’re too soft. One person I know combined the soft feel with an aggressive pivot and they like the sensation. For reference they like Switchbacks.

Compression travel distance for Voile/OMG/Kruezspitze springs

Mfg   Soft Medium Stiff
OMG / Voile voile-std-spring_5x 45mm 39mm 35mm
Kreuzspitze Kreuzspitze Switchback Backcountry_5x 48mm 42mm 37mm
G3   35 33 30

Compression travel distance for 22D Axl springs

An early prototype of an Axl based 2-pin tele binding.

An early prototype of an Axl based 2-pin tele binding.

Mfg Axl Long Axl Stiffy Axl Std
22D 65mm (2.57″) 64mm (2.53″) 50mm (1.99″)

To be more useful/acceptable to a larger number of tele skiers the entire cable system needs to be engineered from scratch, not using conveniently available cable systems developed for side-routed 75mm bindings (Voile, Targa, Cobra, etc.). One consequence of longer springs will be additional weight.

Heel Lever

voile_hardwire_lever_540x540 omg-heel-lever bomber-heel-lever
Voile – GOOD OMG – BETTER Bishop – BEST

The final component you need to pay attention to in the cable assembly is the heel throw (or lever). Most are designed to work in the heel groove of a 75mm boot. This groove is absent on NTN boots, forcing the lever to be up on the heel step. The net result is many heel levers designed for 75mm boots don’t close with a resounding snap on the heel step. It might hold and it might not. At some point it’s bound to fall off unexpectedly. And it feels sloppy so the the springs engage unevenly.

The good news is the heel lever for OMG cables works beautifully. In fact, there’s only one heel throw I’ve tested that snaps on tighter; a Bishop heel lever. The Voile black heel lever works well, but it doesn’t snap as snug as the OMG. Same for a Cobra heel lever, if you can find one. G3 Targa levers do not work well, nor do the Voile heel levers prior to 2014 (grey). It doesn’t hurt to be creative; Nviglio found a BD crampon heel lever worked well. To work properly the heel lever needs to be over center when snapped onto the heel.

Shimming

Shimming may be required for the cable block, or the toe, or the heel, depending on how much ramp angle you like. Do you like your foot level when you’re standing on your heels, or do you prefer your heel raised above the toe and if so, by how much? The answer to that question will determine how much you may need to shim underneath the bellow of the boot so it doesn’t sag when standing flat. Whether you shim above or below the cable block depends on how active you want the binding to be.

Remember, one millimeter down is like two back. If you want to increase activity, shim above the cable block. To reduce activity, shim beneath. This is another way you can fine tune the power delivered in the cable in combination with selecting a stiffer or softer spring. You can shim the toe, the cable post, and heel post up or down to achieve the final desired effect. The higher the pins on the toe, the more shimming you can expect to create. For instance with a G3 Ion toe you will need to shim the cable post at least 10mm to prevent the boot bending when standing flat, probably more depending on your ramp angle.

Conclusion

As you’ve realized, embarking on a DIY telemark binding project is not trival. However, building your own 2-pin telemark binding IS possible, and if you plan it well, the results will be satisfying, especially for the turn earners among you. For this sort of system to gain larger acceptance it is clear that the cable assembly, from the adjustability of the pivot location to the range of motion and tension allowed by the springs needs a serious overhaul. But for those who don’t mind tinkering, the future is here today.

As an example, consider what one intrepid engineer put together.

Jason Quinata’s POLR binding.

Granted, this is the same engineer that gave us Flick-Lock® adjustable ski poles, so this is not an example of amateur hour, but a pro using his passion to build a 2-pin tele trap. However, the tools exist for you to do likewise.

Related Posts
2-pin Tele Chronicles: State of the Art
2-pin Tele Chronicles: Picking your toes
2-pin Tele Chronicles: Use the Force Luke
2-pin Tele Chronicles: Cobbling the Cable
Calculate the intersection of two circles

© 2017


Review: Scarpa’s TX-Pro (2017)

$
0
0

Odds are that if you’re a decent telemark skier, you will love Scarpa’s TX-Pro (2017). The reasons are simple, and with a little investigation and analysis, obvious. The TX-Pro simply nails the peak of the bell curve of what the majority of tele skiers want: a boot that is big enough to deliver plenty of power, but isn’t excessively stiff AND, best of all, has the ability to fit a wide range of foot sizes and shapes thanks to Scarpa’s trademark instep buckle.

Men's and Women's TX-Pro

Men’s and Women’s TX-Pro


If you don’t like the TX-Pro it is because you’re on the edges of the bell curve, not the middle. This could be with respect to whether you want a stiff or soft boot, or more practically, the shape of your foot. If you want extra stiff, TX-Pro simply isn’t; nor is it soft.

Downhill Chops

It IS powerful enough to drive fat skis and hold an edge well, even when the snow is firm. To put some boundaries on that, say up to 105-110mm at the waist. YMMV. Yet the TX-Pro isn’t so stiff that it will overdrive the tips of your skis if you’re ripping pow or slashing crud. For the majority of skiers, it has a good balance between the flex of the bellows, which is on the soft side compared to Crispi, and cuff flex through the ankle. Those who are migrating from a T1 are likely to think the bellows is too soft, but you’re thinking in duckbill terms. The flex you feel is still a combination of the boot and binding, but the mechanics are different without the duckbill. The main difference is that the binding can have a stronger influence on the tele sensation, whereas with 75mm the flex of the bellows dominates.

Tour Mode

In tour mode the Pro has average cuff mobility. If you’re going up a decent incline on the skin track you’ll barely notice the limit on the back of your calf. On the flats, you’ll feel it. It may not be state of the art in the world of touring mobility, but stop whining about it already, it’s not that bad.

With 15° rear mobility TX-Pro doesn't set any records, but it's better than nada.

With 15° rear mobility TX-Pro doesn’t set any records, but it’s better than nada.

Fit

In terms of fit the last is rated at 102mm, which is plenty of width for most feet. Those with narrow feet might even argue it yields a sloppy fit, but that’s based on boots without an instep buckle. The genius of Scarpa’s design is the instep buckle that pulls your heel back into the pocket to give it a solid connection to sole of the boot at its foundation. Combined with a customizable Intuition liner the Scarpa last is legendary for allowing a wide range of feet to fit comfortably and with solid performance, from low to above average volume, in uphill and downhill modes. Those with high volume feet, not only wide but high at the instep as well, you still might get a good fit, but you’ll likely need the help of an savvy bootfitter telemark experience.

Bottom line

It’s a great boot for a full day at the resort in every condition imaginable. For the few who disagree, either you want something stiffer or you’re outside the curve and, for the time being, out of luck. For the rest, step in, buckle up, and prepare to smile.

Scarpa
TX-Pro
MSRP: $700
Weight/boot: (mondo 27.0) 3 lbs., 13 oz. (1750g) • (mondo 25.0) 3 lbs., 8 oz. (1585g)
Size Range: 24.5 – 30.0 (M), 22.5 – 27.0 (W)

Related Posts
Review: Scarpa TX-Pro (2013)

© 2017

Mammoth shoot out: Outlaw VS Meidjo

$
0
0

Mammoth Mountain.

Mammoth Mountain.

The rule of Winter ’15 season has been to act fast when fresh snow arrives, otherwise there won’t be much left. A couple of late storms hit the Sierra last week. Though characteristically weak for this season their freshness coincided with fresh updates to 22 Design’s beta version Outlaw, and a host of revisions to Meidjo that will hopefully overcome weaknesses with the plastic claw assembly and the 2-pin tech toe. It was time to make turns to see if any new flaws were introduced as unintended consequences of fixing others.

A flurry of emails were sent and in short order a quick posse of tele testers was assembled, including B, E, and Mr. and Mrs. Toad, although she excused herself from the testing since her boots were too small to fit the Kingpins. At our disposal were two pair of recently updated Meidjos (S/N 302 and 303) and two pair of Outlaws. The small Meidjo’s were on on G3 Carbon Zenoxides (ver 2015), the large on a pair of 180cm K2 Shreditors (112mm). A pair of large Outlaw’s were on Moment Exit World (115mm), and a pair of smalls on 180cm Blizzard Kabookies (98mm).

Getting In

EYT test crews: B, J, K, and E.

EYT test crews: B, J, K, and E.

The main goal was to get feedback on the tele bindings from B and E. Both confirmed that stepping in to the Outlaw is ridiculously easy. I don’t think there’s an easier binding to get in to; arguably as easy as an alpine binding, but with less heel pressure required to latch in. Getting out, while improved, remains a task that requires coordination and a bit of technique. No plastic failures on either the new or old plastic and we skied Drop Out pretty heavily in conditions that had some heavy chunks strewn between soft, wind drifted snow; the kind of stuff where good balance is demanded, and a binding that helps with that task is appreciated. Outlaw and Meidjo delivered as needed.

The Meidjo did require more coordination to get in to the toe pins, but I noticed that neither man had much issue with it – one quick demonstration was all it took to get a sense of mastery. Meanwhile, I noticed Mrs. Toad was resetting her toes a third time while fiddling with her Dynafit Radicals.

Getting Down

As for downhill performance, both B and E gave the nod to Meidjo, but they both felt that was more a reflection on the ski than in differences with binding performance. As background, B has a pair of TTS bindings and Rottefella Freerides on Cham 107s. E has Freedom’s on both pair of skis he brought with him from Vegas.

B said the Outlaw felt more “hingy.” When pressed to explain what he meant he noticed that the Outlaw caused his Crispi boot to compress more on the back bellows than the front, and more so as his heel was raised higher. I think the fact that Outlaw forced the bellows to collapse more than Meidjo is a testament to it having a higher spring tension. However, the sensation of activity, or differences in the tension perceived is largely determined during the initiation of a tele turn. In the case of NTN bindings, pre-tension appears to have a greater influence, allowing full tension to be experienced immediately. Again, this depends to a large degree on the cable pivot location, the origin of the vector of tension we tele by.

In my experience the Outlaw is clearly more active, thanks to a higher spring rate, but the effective pivot location is 53mm behind the tech inserts, which is further forward than the Meidjo. Contrarily, the M has a softer spring rate, but a cable pivot 60mm back. The net effect is they both engage fast, so they impart balance and confidence in a zone known for the lack of it. This is one of the potential benefits of NTN that was not evident with the Freeride, but is with the Freedom. As for overall tension comparisons, B and E both agreed, Meidjo was very similar to Freedom in terms of downhill feel. Thus, Meidjo felt strong initially, Outlaw stronger inevitably, but the Meidjo was preferred for being slightly less active. There was also an undeniable contribution from the skis.

Without question the Shreditor slayed the Moment Exit World in terms of likeable performance. Overall the Exit World is 184cm long, but with an aggressively rockered tip and tail it acts like 164cm and what is worth liking about a short fat plug of a ski? Ideally the bindings would have been mounted on each person’s favorite ski. Instead, we used what reality offered. Thus, the Shreditor enhanced the Meidjo’s performance while the Moment tarnished the Outlaw’s. In other words, it wasn’t an apples to apples comparison.

Summary

Functionally it appears that, except for brakes and optional crampons the Meidjo and Outlaw are performing as promised. What remains unknown is the long term durability of the plastic portions of both bindings, and for that, we’ll all just have to wait another year and hope a few more guinea pigs are willing to break trail and find the fractures.

© 2015
 

Viewing all 29 articles
Browse latest View live